F-16C Viper: Difference between revisions
(→�) |
m (→�) |
||
| (21 intermediate revisions by 3 users not shown) | |||
| Line 1: | Line 1: | ||
{{Alpha}} | {{Alpha}} | ||
{{RightImg|File:DCS_F-16C_700x1000_v3-1.jpg}} | |||
The F-16 | [[File:F-16C_icon.png|frameless|left]] | ||
Once upon a time, there were some deep rumblings within the defence establishment from a self-proclaimed “Fighter Mafia” that claimed that post-WWII aircraft development had taken a wrong turn. Instead of the on-going trend of expensive higher-tech, missile-laden, huge-engined multi-purpose fighters and bombers, this group advocated cheap, simple, nimble, single-purpose aircraft focused on two key roles: in-close dogfighting (because BFR was a fool's errand) and close air support where energy-manoeuvrability (E-M) was the one performance measure to rule them all. | |||
The result of the Mafia's efforts were three aircraft: the [[A-10C_Warthog|A-10]], the [[F-15C_Eagle|F-15]], and the F-16. The A-10 ended up as a high-tech, missile-laden, far-from-single-purpose (if still CAS-focused) sensor array and bomb truck. The F-15 became a costly, high-tech, missile-laden, huge-engined BFR interceptor (and later a multi-purpose bomber as well, just to rub it in). And the F-16 — the finest example of their core tenets — became a high-tech, missile-laden, huge-engined, BFR/dogfighter/fighter-bomber platform onto which every conceivable piece of aircraft tech could be (and was) bolted, creating the multiest-rolliest thing in the sky. Zero for three for the Fighter Mafia, but still a highly impressive legacy. | |||
The F-16C Viper is the last [[Digital_Combat_Simulator|DCS]] module to complete the trifecta and an attempt give people a reason to finally abandon [[Falcon_Benchmark_Simulator|Falcon BMS]]. It is also, almost ironically and in spite of how it evolved over the years, still the aircraft that most closely matches the initial ideas of the E-M fighter: a ridiculously manoeuvrable dogfighter that just so happened to be an excellent airframe for a ton of other roles. | |||
{{tocright}} | |||
== Features == | == Features == | ||
Much like — some would argue ''much more'' than — the [[FA-18C_Hornet|F/A-18]] that was its main competition in the Lightweight Fighter trials, the F-16C is a multi-role fighter, working as the USAF bulk workhorse for many decades. As such, again much like with the Hornet, a full feature list would become ridiculously long. The main highlights are: | |||
'' | * [[MiG-29_Fulcrum|Almost unrivalled]] manoeuvrability. | ||
'' | * Moon-rocket engine performance — if you somehow get outmanoeuvred, just fly away and try again. | ||
'' | * A superbly user-friendly HOTAS and MFD setup. | ||
* A highly capable and almost as user-friendly in-your-face interface in the form of the Integrated Control Panel (ICP) and Data Entry Display (DED). | |||
* Backup steam gauges (in case the fancy displays go down) that are still almost reasonably and usefully placed. | |||
* A highly capable navigation and sensor suite tied in with datalinks to keep your situational awareness high. | |||
* Helmet-cued AIM-9X over-the-shoulder IR missiles for up-close work and AMRAAMS for BFR duty. | |||
* HARMs and CBU-97s for SEAD and DEAD missions. | |||
* The regular bunch of laser-guided and dumb bombs. | |||
* More Mavericks than any rivet-counter finds reasonable. | |||
=== Missing features === | |||
The F-16C Viper is marked as Early Access in the DCS store for very good reasons. A lot of forum drama has been caused by a constant push and pull between work on the Viper and the completion of the Hornet module, and many systems and tools familiar to old BMS players are still missing — more still will ''never'' come. | |||
* A lot of fancy navigation trickery on the DED. | |||
* Proper sensor integration with HUD marking, cursor zero, and hand-off modes, although work on this has begun. | |||
* Advanced HARM target modes and the HARM Targeting System pod. | |||
* Proper weapon setup and HSI and MFD preprogramming via data cassette (some of it is cheated and automatically populated, such as SAM locations on the HSI). | |||
In particular, ED has stated that some much-loved features from BMS will never come because the block simulated in the Viper module never had them: | |||
* GBU-39 SDB:s | |||
* JSOW-B:s | |||
* Terrain-following radar and LANTIRN overlays. | |||
== Flying the F-16C == | |||
The F-16 was the first aircraft to use a dynamically unstable flight dynamic under the control of a fly-by-wire system to create a highly agile yet highly controllable aircraft. While it is ''very'' quick to respond to inputs, and was designed from the start to let rapid rolls and tight 9G turns, it is not actually twitchy or nervous, and will respond to a steady hand with very stable and controlled flight. It is entirely possible to overwhelm the FBW system and end up in a very bad situation, but it takes some doing, and for the most part it is just a matter of suggesting a direction for the plane to go and it will do so. | |||
This is made especially evident in two ways: one is when landing, when much like any other FBW aircraft, you only really need to dial in the proper AoA (as indicated by the indexer next to the HUD and the AoA staple in the landing HUD screen) and the Viper will maintain that angle. Unless there's a lot of wind to parry, you only really need to use the throttle to move the velocity vector up and down to where it needs to be. The other is just plain ferry flight, where a highly competent autopilot can dutifully follow waypoints for you or even go into circling patterns around fixed points if you ask it to, leaving you to fully attend to sensor usage and weapons delivery. | |||
=== Cockpit overview === | |||
[[File:F16_Dash.jpg|800px|frameless|F-16C Viper dashboard.]] | |||
[[File:F16_Pit.jpg|800px|frameless|F-16C Viper cockpit.]] | |||
=== Getting into the air === | |||
In spite of being a full-sim aircraft (albeit still an incomplete one) and a rather advanced one at that, given all the extra bits that have been bolted onto the airframe over the years, the F-16C is surprisingly easy to get going. As with most modern aircraft, its navigation alignment process can take a while, but the rest is very familiar and brief to anyone who's gotten into the DCS swtich-flipping. It is less involved than the [[FA-18C_Hornet|F/A-18C]] and a far cry from the multiple interdependent systems [[A-10C_Warthog|A-10C]]. | |||
As always the {{Key|RWin}}{{Key|Home}} “cheat” key combo is available to automate the start-up process, and the manual and [[#Links_and_files|Chuck's guide linked below]] give a full account of the procedure. The broad strokes are: | |||
* Battery power and flight control system on.<br><small>(Main Power switch to Battery, Flight Control test switch to Test.)</small> | |||
* Engine start.<br><small>(Jet Fuel switch to Start 1, throttle out of detent.)</small> | |||
* Power everything.<br><small>(Main Power switch to Main Pwr, turn on Parking Brakes, all Avionics, all Sensors, Countermeasures, Radio, IFF, Lights, HUD brightness.)</small> | |||
* Check and note your position on the map (because there is no kneeboard option for this unlike every other module) and get ready to enter it in the DED<br><small>(LIST > 6 INS — note the pre-stored position and altitude.)</small> | |||
* Start the INS alignment — once started, you have two minutes to enter or confirm the position shown in the DED INS page.<br><small>(INS dial to NORM, use the number keys and the dobble switch on the ICP to move between and change the starting position.)</small> | |||
* While the INS is aligning (the INS page will count down the readiness state and finally say 6 RDY on the top row when done), close up the cockpit and set up everything else.<br><small>(Oxygen, radios, weapon loadout, waypoints, and all that jazz.)</small> | |||
* When aligned, move the INS switch to NAV, release the parking brake, and waddle off into the air per normal procedures. | |||
=== Shooting something === | |||
The purpose of the Viper is to make things go boom. Consequently, a fair amount of work has gone into making that as easy as possible and there are three common and easy-to-reach controls that go into that no matter what: the Master Arm switch (can't shoot things if you don't turn shoot on); the AA mode override switch on the throttle (that lets you quickly switch to BFR and dogfight modes); and the master A-A and A-G master mode buttons along the top of the ICP. | |||
If at any time things are not behaving as expected, check these three first: that the override switch is in the middle (no override) position, that master arm is on, and that you are actually in the right master mode. Also, naturally, there are usually all kinds of sensors involved that need to be turned on (radar, TGP, head cueing system etc.) but those are more purpose-specific. | |||
=== | ==== BVR engagement ==== | ||
[[File:F-16_BVR.jpg|thumb|AMRAAM BVR engagement]] | |||
Completely contrary to the initial design goal, and in spite of not being able to carry quite the same insane amount of AMRAAMs as the [[F-15C_Eagle|Eagle]] or [[FA-18C_Hornet|Hornet]], the Viper is a highly capable BFR platform. Its speed and climbing power lets it position itself for very long shots and its data-linking capability (once it is fully fleshed out in the module) lets it make sense of, and usefully partition, very large blobs of enemies on the radar. | |||
To toss an AMRAAM at something offensive, you need to: | |||
* Press the A-A master mode button or push the override switch into the MRM (aft) position. | |||
* | * Make the radar SOI by pressing ''DMS Down'' to cycle through the available sensor sources. | ||
* Observe the radar picture in RWS (range while scan) mode to find targets, setting elevation and range to give the best coverage of them.<br><small>(All targets start out as small filled-in boxes, or “search targets”, showing that the radar scan has found something.)</small> | |||
* | * Switch over to TWS (track while scan) mode to allow missile guidance without losing track of the overall battlefield.<br><small>(You can toggle between TWS and RWS using the OSB 2 on the radar display, or by pressing ''TMS Right Long''.)</small> | ||
* A search target that is detected two scans in a row becomes a “track target”, denoted by a larger filled-in box on the radar. | |||
* | * Move the radar cursor over a search target and IFF-interrogate it using ''TMS Left''. | ||
* | * Targets that come back as hostile (or just not friendly) can be turned into “system targets&rquo; by slewing the radar cursor over them individually and pressing ''TMS Up'' or by pressing ''TMS Right'' if no system targets exist yet. | ||
* | * A system target can further be turned into “bugged target” by once again slewing the radar cursor over it and pressing ''TMS Up'' or ''TMS Right''.<br><small>(Once targets have been bugged, or if no bugged target has been selected, you use ''TMS Right'' to cycle through system targets and turning them into bugged targets.)</small> | ||
* The radar will transition into a narrower scan mode and will try to keep the bugged target in the centre of its scan — in addition, detailed information about the target and its relation to the AMRAAM launch zone will become available. | |||
* Manoeuvre the aircraft to maximise the missile performance parameters by following the HUD cues; fire when ready. | |||
* | |||
* | |||
The AMRAAM will fly towards a point in space where it can hopefully start tracking the bugged target on its own — if the target manoeuvres outside of the missile's detection zone, it will go dumb. The time until the missile goes active is shown on the right side of the HUD at the bottom of the launch zone display, using the form “Axx” where the xx signifies the time left to pitbull. | |||
The | |||
By cycling through system targets using ''TMS Right'', you can quickly fire off multiple missiles against multiple targets in rapid succession. | |||
=== | ==== Using the HARM ==== | ||
[[File:F-16_HAS.jpg|thumb|HARM HAS engagement]] | |||
The AGM-88C High Speed Anti-Radiation Missile is a very capable missile that can be used in a number of different ways. Unfortunately, most of those ways have yet to be implemented in the DCS version of the Viper. All that is available at the moment is the HAS (HARM as Sensor) mode. Fortunately, it is still a very capable and easy-to-use mode, but it requires a bit of fore-knowledge and/or quick fingers to get to work properly. | |||
HAS uses a number of different “Tables” to filter out different signals for the HARM sensor to pick up, and it is essentially looking for those signals through the missile's seeker, kind of like how you would use a Maverick. The main downside is that this mode just finds signals — it has no way of telling how far away they are, only if their head-on relationship to the seeker head. With a bit of luck you know of the SAM locations already and have them marked on your HSD page, which lets you get a range estimate that way, but the missile itself has no idea and will just head straight for the signal, which reduces its effective range to the fanciful numbers it would get when lofted. Other targeting modes and sensors (like the much-awaited HTS — HARM Targeting System pod) lets the missile go much further and in much more useful directions than straight ahead. | |||
This lacking feature, along with the lack of a proper DTC system for the F-16 that would let you set up your master modes ahead of time, means that a bit of preparation is needed to get the missile going. | |||
[[File:SA3GoesBoom.jpg|300px|frameless|right|SA-3 Goes Boom]] | |||
* Make sure the RWR is working to show you the signal you should be looking for. | |||
* Enter the A-G master mode using the buttons on top of the ICP. | |||
* Make sure you have immediate access to the following pages: WPN (commonly on the left MFD), SMS (on the right by default) and HSD (commonly on the right MFD). Pick any unused or useless OSB function on the bottom row, press the OSB twice and select the appropriate page for future use. | |||
* On the SMS page, select “AG88” as your active weapon using OSB 6, and turn it on using OSB 7. | |||
* On the WPN page, you will now see the world from the HARM sensor as indicated by the “HAS” under OSB 1. | |||
* Cross-reference with your RWR and/or mission briefing to select the appropriate emitter table using OSB 2. The available emitter types will be listed along the left side of the WPN page. | |||
* Make the WPN page SOI by pressing ''DMS Down'' to cycle through the available sensor sources. | |||
* Slew the targeting cue over the emitter you want to get rid of and lock it up with ''TMS Up'' (you can unlock it again to go back to the search mode using ''TMS Down''). | |||
* Estimate the range to the emitter using the HSD, if it's a known emitter, or even the HUD if it sits around a predefined waypoint that you're already heading towards. | |||
* When everything seems to be within parameters, pickle. | |||
[[File:F16Viper.jpg|800px|frameless|F-16C over Beirut]] | |||
== | == Links and files == | ||
* [https://www.mudspike.com/chucks-guides-dcs-f-16c-viper/ Chuck's F-16C Viper guide] at Mudspike. | |||
* [https://www.digitalcombatsimulator.com/en/shop/modules/viper/ DCS: F-16C Viper] in the DCS shop. | |||
=== | === Related DCS Modules === | ||
* DCS: F-16C ''Red Flag 21-1'' Campaign by Bunyap Campaigns | |||
== | == More information == | ||
== | [[File:F-16_Side_Front_Cropped.jpg|800px|thumb|left|A Thunderbirds F-16 at the [https://www.nationalmuseum.af.mil/ National Museum of the USAF]]] | ||
<youtube>https://www.youtube.com/watch?v=s0liIJvr7uU</youtube> | |||
<youtube>https://www.youtube.com/watch?v=335GdTqtyLs</youtube> | |||
* [https://en.wikipedia.org/wiki/General_Dynamics_F-16_Fighting_Falcon General Dynamics F-16 Fighting Falcon] on wikpedia. | |||
* [https://www.globalsecurity.org/military/systems/aircraft/f-16.htm F-16 Fighting Falcon] on globalsecurity.org | |||
* [https://www.youtube.com/watch?v=uJrMSNM7X08&list=PLer9oF4AanvFoD2t2Aq3aYRYkJs6v9wG8&index=1 Matt Wagner's F-16 Viper] series. | |||
* [[User_talk:Wonkotron|Wonkotron's Quick Usage Guide]] | |||
{{Aircraft}} | |||
[[Category:Full-sim_Aircraft]][[Category:Jet_Aircraft]][[Category:Aircraft]][[Category:Modules]][[Category:Alpha_Modules]] | |||
Latest revision as of 19:34, 30 July 2021
| This is an alpha module.
This module is still being developed and is missing central features and equipment options. While it is playable, it may have major bugs, and procedures may have inconsistent or unexpected results. The intrepid and very interested may want to buy it; others should probably wait for a more stable or complete release. |
Once upon a time, there were some deep rumblings within the defence establishment from a self-proclaimed “Fighter Mafia” that claimed that post-WWII aircraft development had taken a wrong turn. Instead of the on-going trend of expensive higher-tech, missile-laden, huge-engined multi-purpose fighters and bombers, this group advocated cheap, simple, nimble, single-purpose aircraft focused on two key roles: in-close dogfighting (because BFR was a fool's errand) and close air support where energy-manoeuvrability (E-M) was the one performance measure to rule them all.
The result of the Mafia's efforts were three aircraft: the A-10, the F-15, and the F-16. The A-10 ended up as a high-tech, missile-laden, far-from-single-purpose (if still CAS-focused) sensor array and bomb truck. The F-15 became a costly, high-tech, missile-laden, huge-engined BFR interceptor (and later a multi-purpose bomber as well, just to rub it in). And the F-16 — the finest example of their core tenets — became a high-tech, missile-laden, huge-engined, BFR/dogfighter/fighter-bomber platform onto which every conceivable piece of aircraft tech could be (and was) bolted, creating the multiest-rolliest thing in the sky. Zero for three for the Fighter Mafia, but still a highly impressive legacy.
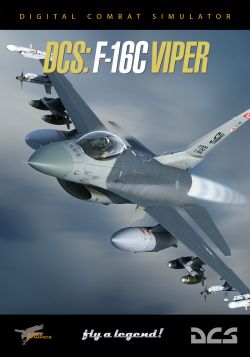
The F-16C Viper is the last DCS module to complete the trifecta and an attempt give people a reason to finally abandon Falcon BMS. It is also, almost ironically and in spite of how it evolved over the years, still the aircraft that most closely matches the initial ideas of the E-M fighter: a ridiculously manoeuvrable dogfighter that just so happened to be an excellent airframe for a ton of other roles.
Features
Much like — some would argue much more than — the F/A-18 that was its main competition in the Lightweight Fighter trials, the F-16C is a multi-role fighter, working as the USAF bulk workhorse for many decades. As such, again much like with the Hornet, a full feature list would become ridiculously long. The main highlights are:
- Almost unrivalled manoeuvrability.
- Moon-rocket engine performance — if you somehow get outmanoeuvred, just fly away and try again.
- A superbly user-friendly HOTAS and MFD setup.
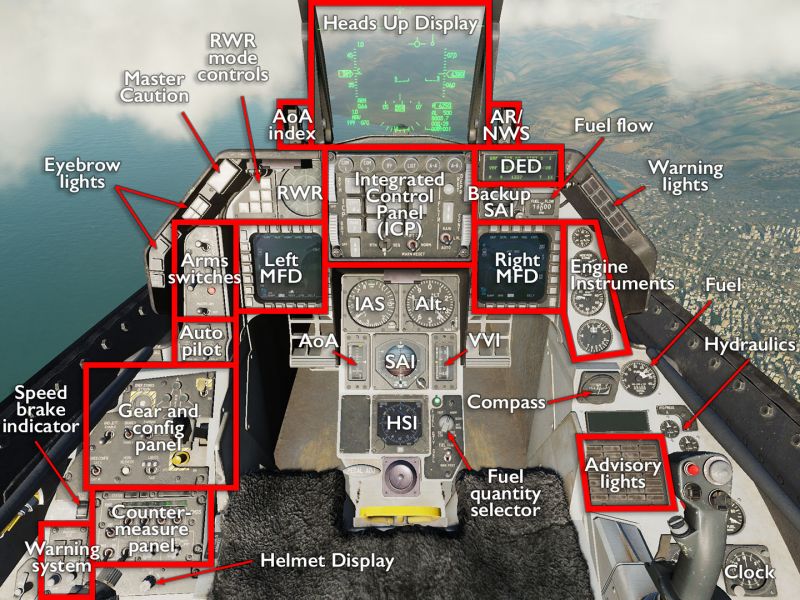
- A highly capable and almost as user-friendly in-your-face interface in the form of the Integrated Control Panel (ICP) and Data Entry Display (DED).
- Backup steam gauges (in case the fancy displays go down) that are still almost reasonably and usefully placed.
- A highly capable navigation and sensor suite tied in with datalinks to keep your situational awareness high.
- Helmet-cued AIM-9X over-the-shoulder IR missiles for up-close work and AMRAAMS for BFR duty.
- HARMs and CBU-97s for SEAD and DEAD missions.
- The regular bunch of laser-guided and dumb bombs.
- More Mavericks than any rivet-counter finds reasonable.
Missing features
The F-16C Viper is marked as Early Access in the DCS store for very good reasons. A lot of forum drama has been caused by a constant push and pull between work on the Viper and the completion of the Hornet module, and many systems and tools familiar to old BMS players are still missing — more still will never come.
- A lot of fancy navigation trickery on the DED.
- Proper sensor integration with HUD marking, cursor zero, and hand-off modes, although work on this has begun.
- Advanced HARM target modes and the HARM Targeting System pod.
- Proper weapon setup and HSI and MFD preprogramming via data cassette (some of it is cheated and automatically populated, such as SAM locations on the HSI).
In particular, ED has stated that some much-loved features from BMS will never come because the block simulated in the Viper module never had them:
- GBU-39 SDB:s
- JSOW-B:s
- Terrain-following radar and LANTIRN overlays.
Flying the F-16C
The F-16 was the first aircraft to use a dynamically unstable flight dynamic under the control of a fly-by-wire system to create a highly agile yet highly controllable aircraft. While it is very quick to respond to inputs, and was designed from the start to let rapid rolls and tight 9G turns, it is not actually twitchy or nervous, and will respond to a steady hand with very stable and controlled flight. It is entirely possible to overwhelm the FBW system and end up in a very bad situation, but it takes some doing, and for the most part it is just a matter of suggesting a direction for the plane to go and it will do so.
This is made especially evident in two ways: one is when landing, when much like any other FBW aircraft, you only really need to dial in the proper AoA (as indicated by the indexer next to the HUD and the AoA staple in the landing HUD screen) and the Viper will maintain that angle. Unless there's a lot of wind to parry, you only really need to use the throttle to move the velocity vector up and down to where it needs to be. The other is just plain ferry flight, where a highly competent autopilot can dutifully follow waypoints for you or even go into circling patterns around fixed points if you ask it to, leaving you to fully attend to sensor usage and weapons delivery.
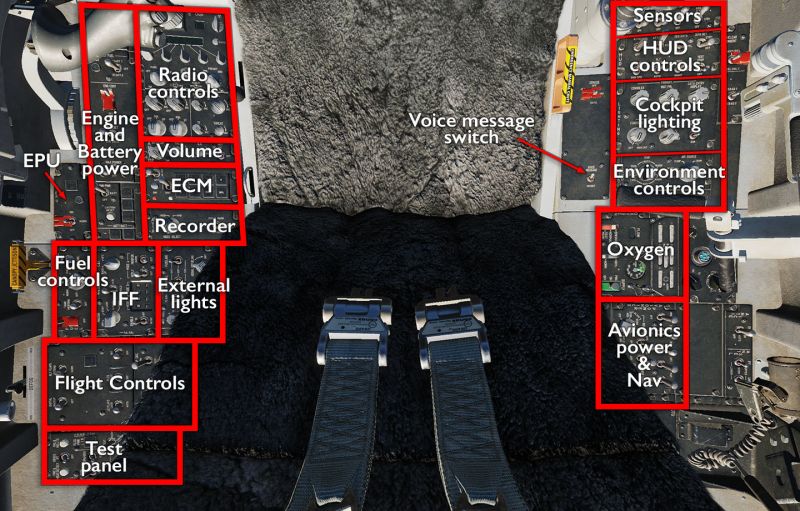
Cockpit overview
Getting into the air
In spite of being a full-sim aircraft (albeit still an incomplete one) and a rather advanced one at that, given all the extra bits that have been bolted onto the airframe over the years, the F-16C is surprisingly easy to get going. As with most modern aircraft, its navigation alignment process can take a while, but the rest is very familiar and brief to anyone who's gotten into the DCS swtich-flipping. It is less involved than the F/A-18C and a far cry from the multiple interdependent systems A-10C.
As always the RWinHome “cheat” key combo is available to automate the start-up process, and the manual and Chuck's guide linked below give a full account of the procedure. The broad strokes are:
- Battery power and flight control system on.
(Main Power switch to Battery, Flight Control test switch to Test.) - Engine start.
(Jet Fuel switch to Start 1, throttle out of detent.) - Power everything.
(Main Power switch to Main Pwr, turn on Parking Brakes, all Avionics, all Sensors, Countermeasures, Radio, IFF, Lights, HUD brightness.) - Check and note your position on the map (because there is no kneeboard option for this unlike every other module) and get ready to enter it in the DED
(LIST > 6 INS — note the pre-stored position and altitude.) - Start the INS alignment — once started, you have two minutes to enter or confirm the position shown in the DED INS page.
(INS dial to NORM, use the number keys and the dobble switch on the ICP to move between and change the starting position.) - While the INS is aligning (the INS page will count down the readiness state and finally say 6 RDY on the top row when done), close up the cockpit and set up everything else.
(Oxygen, radios, weapon loadout, waypoints, and all that jazz.) - When aligned, move the INS switch to NAV, release the parking brake, and waddle off into the air per normal procedures.
Shooting something
The purpose of the Viper is to make things go boom. Consequently, a fair amount of work has gone into making that as easy as possible and there are three common and easy-to-reach controls that go into that no matter what: the Master Arm switch (can't shoot things if you don't turn shoot on); the AA mode override switch on the throttle (that lets you quickly switch to BFR and dogfight modes); and the master A-A and A-G master mode buttons along the top of the ICP.
If at any time things are not behaving as expected, check these three first: that the override switch is in the middle (no override) position, that master arm is on, and that you are actually in the right master mode. Also, naturally, there are usually all kinds of sensors involved that need to be turned on (radar, TGP, head cueing system etc.) but those are more purpose-specific.
BVR engagement
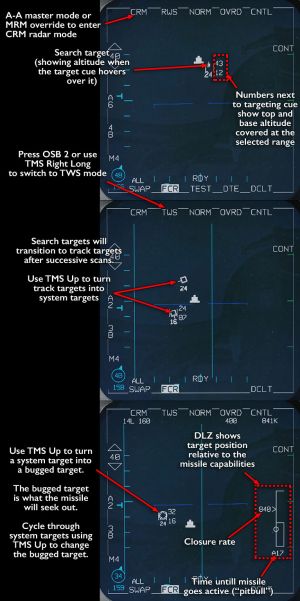
Completely contrary to the initial design goal, and in spite of not being able to carry quite the same insane amount of AMRAAMs as the Eagle or Hornet, the Viper is a highly capable BFR platform. Its speed and climbing power lets it position itself for very long shots and its data-linking capability (once it is fully fleshed out in the module) lets it make sense of, and usefully partition, very large blobs of enemies on the radar.
To toss an AMRAAM at something offensive, you need to:
- Press the A-A master mode button or push the override switch into the MRM (aft) position.
- Make the radar SOI by pressing DMS Down to cycle through the available sensor sources.
- Observe the radar picture in RWS (range while scan) mode to find targets, setting elevation and range to give the best coverage of them.
(All targets start out as small filled-in boxes, or “search targets”, showing that the radar scan has found something.) - Switch over to TWS (track while scan) mode to allow missile guidance without losing track of the overall battlefield.
(You can toggle between TWS and RWS using the OSB 2 on the radar display, or by pressing TMS Right Long.) - A search target that is detected two scans in a row becomes a “track target”, denoted by a larger filled-in box on the radar.
- Move the radar cursor over a search target and IFF-interrogate it using TMS Left.
- Targets that come back as hostile (or just not friendly) can be turned into “system targets&rquo; by slewing the radar cursor over them individually and pressing TMS Up or by pressing TMS Right if no system targets exist yet.
- A system target can further be turned into “bugged target” by once again slewing the radar cursor over it and pressing TMS Up or TMS Right.
(Once targets have been bugged, or if no bugged target has been selected, you use TMS Right to cycle through system targets and turning them into bugged targets.) - The radar will transition into a narrower scan mode and will try to keep the bugged target in the centre of its scan — in addition, detailed information about the target and its relation to the AMRAAM launch zone will become available.
- Manoeuvre the aircraft to maximise the missile performance parameters by following the HUD cues; fire when ready.
The AMRAAM will fly towards a point in space where it can hopefully start tracking the bugged target on its own — if the target manoeuvres outside of the missile's detection zone, it will go dumb. The time until the missile goes active is shown on the right side of the HUD at the bottom of the launch zone display, using the form “Axx” where the xx signifies the time left to pitbull.
By cycling through system targets using TMS Right, you can quickly fire off multiple missiles against multiple targets in rapid succession.
Using the HARM
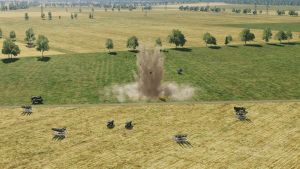
The AGM-88C High Speed Anti-Radiation Missile is a very capable missile that can be used in a number of different ways. Unfortunately, most of those ways have yet to be implemented in the DCS version of the Viper. All that is available at the moment is the HAS (HARM as Sensor) mode. Fortunately, it is still a very capable and easy-to-use mode, but it requires a bit of fore-knowledge and/or quick fingers to get to work properly.
HAS uses a number of different “Tables” to filter out different signals for the HARM sensor to pick up, and it is essentially looking for those signals through the missile's seeker, kind of like how you would use a Maverick. The main downside is that this mode just finds signals — it has no way of telling how far away they are, only if their head-on relationship to the seeker head. With a bit of luck you know of the SAM locations already and have them marked on your HSD page, which lets you get a range estimate that way, but the missile itself has no idea and will just head straight for the signal, which reduces its effective range to the fanciful numbers it would get when lofted. Other targeting modes and sensors (like the much-awaited HTS — HARM Targeting System pod) lets the missile go much further and in much more useful directions than straight ahead.
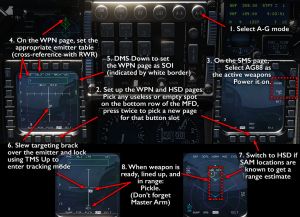
This lacking feature, along with the lack of a proper DTC system for the F-16 that would let you set up your master modes ahead of time, means that a bit of preparation is needed to get the missile going.
- Make sure the RWR is working to show you the signal you should be looking for.
- Enter the A-G master mode using the buttons on top of the ICP.
- Make sure you have immediate access to the following pages: WPN (commonly on the left MFD), SMS (on the right by default) and HSD (commonly on the right MFD). Pick any unused or useless OSB function on the bottom row, press the OSB twice and select the appropriate page for future use.
- On the SMS page, select “AG88” as your active weapon using OSB 6, and turn it on using OSB 7.
- On the WPN page, you will now see the world from the HARM sensor as indicated by the “HAS” under OSB 1.
- Cross-reference with your RWR and/or mission briefing to select the appropriate emitter table using OSB 2. The available emitter types will be listed along the left side of the WPN page.
- Make the WPN page SOI by pressing DMS Down to cycle through the available sensor sources.
- Slew the targeting cue over the emitter you want to get rid of and lock it up with TMS Up (you can unlock it again to go back to the search mode using TMS Down).
- Estimate the range to the emitter using the HSD, if it's a known emitter, or even the HUD if it sits around a predefined waypoint that you're already heading towards.
- When everything seems to be within parameters, pickle.
Links and files
- Chuck's F-16C Viper guide at Mudspike.
- DCS: F-16C Viper in the DCS shop.
Related DCS Modules
- DCS: F-16C Red Flag 21-1 Campaign by Bunyap Campaigns
More information
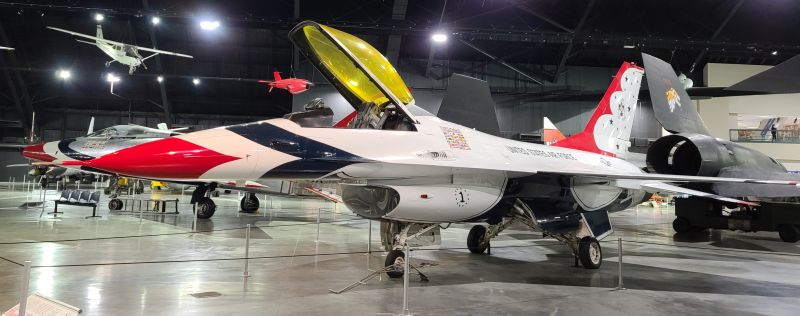
- General Dynamics F-16 Fighting Falcon on wikpedia.
- F-16 Fighting Falcon on globalsecurity.org
- Matt Wagner's F-16 Viper series.
- Wonkotron's Quick Usage Guide


