Mirage M-2000C: Difference between revisions
mNo edit summary |
m (→�) |
||
| Line 27: | Line 27: | ||
=== Missing features === | === Missing features === | ||
The M-2000C is for the most part a finished product — finished enough, at least, to not be marked as “early access” in the DCS shop. | The M-2000C is for the most part a finished product — finished enough, at least, to not be marked as “early access” in the DCS shop. While it may not be full-on beta levels of completion a number of missing (supposedly upcoming) features to the otherwise very central VTB/HDD radar and its display are still missing: | ||
* Most target information switches are not functioning. | * Most target information switches are not functioning. | ||
* Ground mapping radar is missing. | * Ground mapping radar is missing. | ||
Revision as of 13:25, 10 December 2020
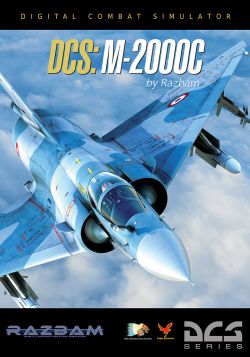
The Dassault Mirage 2000C is a supersonic multirole fly-by-wire delta-wing aircraft, which sans technobabble means it is fast and nimble and capable of both air-to-air and air-to-ground combat. Of the two tasks, the C model (for “Chasseur,” or fighter) is more at home in the air-to-air role, featuring DCS's first proper BVR radar available in any of the full-fidelity, non-FC3 aircraft. Before this, there were only the F-5E-3, that had no radar-guided weapons, and the MiG-21bis that had no look-down capabilities, neither of which offered any kind of tracking or target information — only an indistinct blip to steer towards.
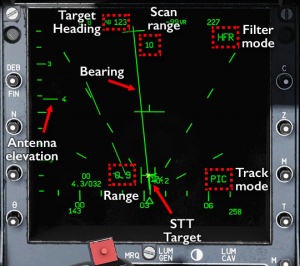
Some would argue that the M-2000C's radar, with its need to pick the right filtering modes and scan zones and antenna elevation and, consequently, with its tendency to lose track of a target at the most inopportune moments, is no better than those earlier modules. Those people are silly and wrong.
Features
The M-2000C's air-to-air focus is made further evident by its features list:
- A Mach 2+ top speed and ridiculous climb rate.
- Matra Magic IR missiles and Super-530D semi-active radar homing missiles.
- A built-in ECM pod and countermeasure pods that contain tons of chaff, but very few flares, and a competent RWR to help with employing them properly.
- The option to replace its very handy landing drag chute with an additional “Eclair” countermeasure pod to augment and balance out the chaff and flare situation a bit.
- Limited and inaccurate CCIP and CCRP modes that are tied to specific bombs rather than selectable by the pilot.
- In spite of that, the ability to carry a respectable number of bombs, including LGBs.
To get to where it needs to go, the M-2000C also features:
- A complex but very competent inertial navigation system.
- TACAN navigation, with a built-in special mode to navigate to TACAN offset point.
- Thanks to its FBW control system, a very competent and flexible autopilot, including an ILS-guided auto-landing mode.
In many ways, then, the M-2000C is very much like a more fully-developed and advanced version of the F-5E-3 — if you like flying the MiG-28 Tiger, chances are that you will enjoy flying the Baguette as well.
Comes with the built-in M-2000C Campaign and M-2000C Coup d'Etat campaigns.
Missing features
The M-2000C is for the most part a finished product — finished enough, at least, to not be marked as “early access” in the DCS shop. While it may not be full-on beta levels of completion a number of missing (supposedly upcoming) features to the otherwise very central VTB/HDD radar and its display are still missing:
- Most target information switches are not functioning.
- Ground mapping radar is missing.
- GCI navigation mode is missing (but unlikely to ever be implemented).
Flying the M-2000C
The M-2000C is very very easy to fly thanks to its fly-by-wire controls. You point the flight path marker where you want to go and the computers try go get you there. If they can not, they keep trying until you have no energy and fall belly-first into the ground. Departure from controlled flight invariably manifests itself as the airplane pointing in one direction, but gently and inevitably sliding off in another, and getting out of it is mostly about convincing the computer that, no, you actually want to try a more fruitful direction that the one it is currently struggling to maintain. Almost always, this means forcing the aircraft into the ground and ignoring the screaming warnings, possibly in combination with some deliberate pilot-induced oscillation to forcibly overload the FBW system.
Under more normal flight conditions, it gets even easier since the FBW enables and drives an advanced, but very simple to use, autopilot system. In its most basic mode, it simply holds the current attitude and that attitude can be adjusted by moving a steering dot around on the HUD with the trim hat. Alternatively, you can momentarily pause the AP with a button press, manually adjust the aircraft, and the AP will hold whatever attitude it is in when the button is released. In the more advanced altitude hold modes (yes, plural) it either holds the current altitude or holds a set altitude once reached. Here, the trim hat changes the altitude and also dials in a course heading on the nav indicator. Finally, there is the approach mode, that follows a captured ILS signal down to the threshold — under good conditions, it takes the plane all the way down to the tarmac (but do not rely on it — hands on stick at all times). Note that none of these modes (especially not the landing AP) automate the throttle. It is up to the pilot to maintain proper thrust at all times.
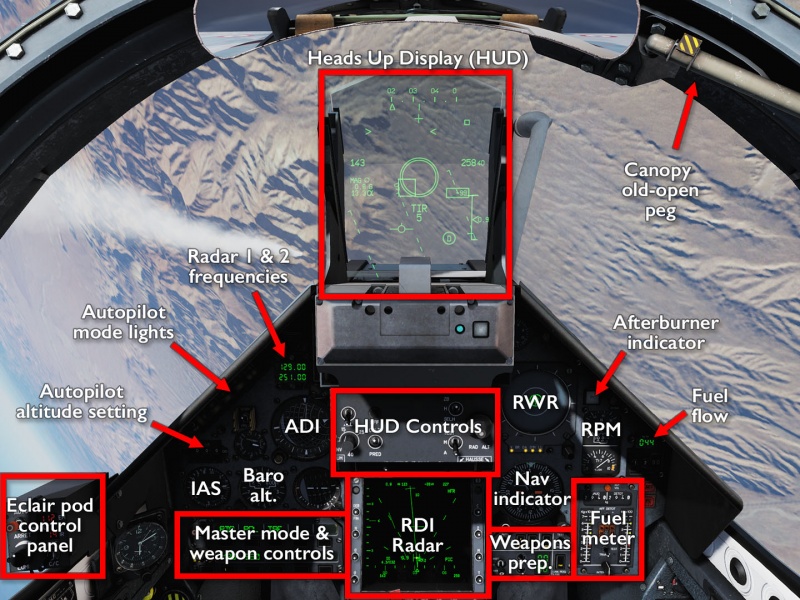
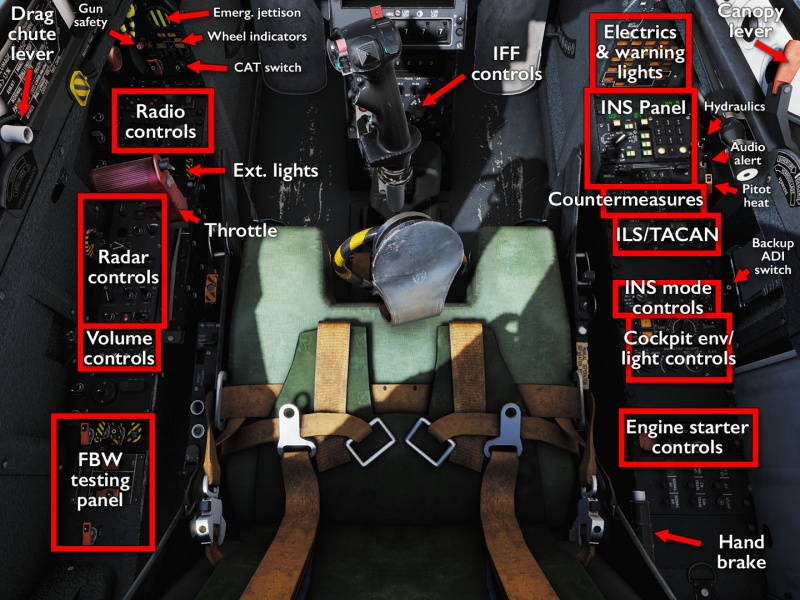
Cockpit overview
Getting into the air
Getting the M-2000C started is, on the one hand, very easy: just flip everything on — preferably, but not necessarily, in the right order — and the difficulty lies in remembering every little nook and cranny that there are switches in. On the other hand, it is a very long-winded process, due to two of the more complicated on-board systems: the INS and the FBW.
The inertial navigation system needs to be initialised, aligned, and possibly even programmed with waypoints if the mission itself does not provide them. The alignment is a five-minute process; the waypoint input can take a very long time if it is a complicated route or if lots of details are added to it. You can certainly take off without the INS working, but of course, you will be relying on visual or radio navigation at that point.
Similarly, the fly-by-wire system and autopilot require a fair amount of testing to give a green light and be safe for operation. It is also a bit annoying because, while completely automated, it is just long enough that it is not just something you speed by, but at the same time, it is just short enough that it does not really give you any good opportunity to deal with some other system setup at the same time. Again, you can take off without these tests, but a very angry red warning light will be glaring at you throughout the entire flight, and if something goes wrong, you might not know it.
For those in a hurry, the aircraft has the fairly standardised RWinHome “cheat” hotkey to run through the startup process. For everyone else, the procedure consists of:
- Turn on battery, tansformer, and alternators.
- Check your kneeboard(!) — it contains the information you need for alignment and is also used to set up some weapons (notably LGBs) that cannot be adjusted on the fly once you are off the ground.
- Start INS alignment. While it is going, check that the waypoints are set up and/or input them yourself while yelling at the ground crew/mission designer.
- Make sure the hand brake is on.
- Turn on fuel pumps, air vents, and press the start button.
- Push the throttle just out of idle to get it going, then make sure it settles within proper working parameters.
- Turn on everything else that you'll need (in particular, start pre-heating the radar).
- Test the FBW system.
- By now, the INS should be aligned — turn it on properly.
- Set up what's left (CAT, radar modes, radios, countermeasures etc).
- Remember that you have a handbrake and disengage it before rolling out.
The full process, and in particular the differing methods for aligning the INS, are described in more detail in the manual, and in the checklist and, as usual, Chuck's guide linked below.
Shooting something
The “Chasse” version of the Mirage is primarily intended for air-to-air engagements, and the different ease of employment of the related systems amply demonstrate this. Weapons are managed by the PCA (“Poste de Commande Armement”) and PPA (“Poste de Préparation Armement”) panels on the left and right side of the radar display. The former is for selecting weapons and nav modes; the latter is for setting up those weapons. The latter is hardly ever used with AA weapons other than to put the weapons to sleep in a long ferrying flight (eg. to not waste IR seeker coolant).
For AA, there are two HOTAS switches that are particularly important to have bound and be familiar with: the Weapon Select rocker on the throttle and the Special Modes switch on the stick. The former lets you switch between the three air-to-air weapons the M2000C carries; the latter lets you bypass some (but not all) of the annoyances that the Mirage's radar is famous for. Both the radar and the S530 missile have BVR capabilities, but the need to use single-target track to guide the semi-active missile all the way to the target means that after the first shot, you are likely to be in the merge at close range, at which point the close-combat vertical, horizontal and boresight modes will be far more effective than any manual fiddling.
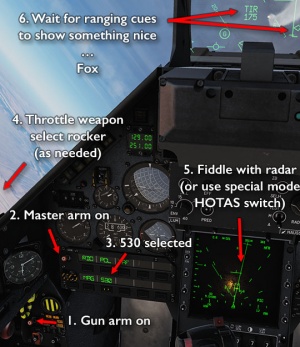
The process for selecting weapons and engaging an air target is therefore this:
- Gun arm on.
- Master arm on.
- 530 button selected on the PCA
- Throttle weapon rocker to select the appropriate weapon (centred will select whatever is picked on the PCA, in this case the S530).
- Depress the special modes button to cancel any pre-existing modes.
- Lock something up — automatically using the stick Special Mode switch, or manually by fiddling with lock-on cues and lock buttons. Remember that the S530 needs STT (PIC) mode to track, and that you need to lock once to go into TWS and once more to enter STT.
- Watch the HUD (and/or radar) for steering and ranging cues — once within reasonable range, the “TIR” (SHOOT) cue will show.
- Fox (and remember to keep tracking the target if using S530:s).
Smart weapons
Much like the F-5E-3, the M2000C can carry a respectable amount of air-to-ground weapons, but is hampered by missing and/or inaccurate delivery modes to put those weapons where they need to go. It has both CCIP and CCRP, and even a fancy INS-guided bomb delivery mode, but they are not pilot-selectable and instead depend on which weapon is used. The CCRP mode is generally less precise as the steering guidance is not good about showing small deviations, and the release cue can appear very quickly with some attack profiles.
Fortunately, much like with the F-5E, there is a solution: laser guided bombs and JTAC/buddy-lasing.
Indeed, the employment procedure as a whole is very similar, except for using the M2000C's target spot designation feature rather than a fixed depressed aiming pipper. Note that, while the wording in the manual almost seems to imply otherwise, the M2000C does not have a laser spot sensor — putting the target point on the right spot is still something the pilot has to do manually, either using visual spotting, directions from FAC, or smoke deployed on the target.
- Before start-up, go into the kneeboard and set the laser code that will be used. If you forget this, you better hope that whoever is lasing is able to change their code after the fact, because you will not be able to.
- When approaching the target area, turn radar on and master arm on.
- On the PCA, select EL1 for LGB:s.
- Throttle weapon select switch to the centre (PCA select) position, thereby selecting the LGB:s.
- Depress the special modes button to cancel any previous mode, then press special modes forward to enter ground designation mode.
- The PCA and radar should both engage TAS (radar ranging) automatically; optionally turn RS (altimeter ranging) on to provide additional/backup data.
- On the PPA, flip the fusing switch to INST.
- Put the HUD targeting cue onto the expected target spot and press the HOTAS AG DESIGNATE button.
- Follow the HUD steering cues.
- When the release cue shows up (since an earlier pickle-to-release bug has been fixed) press and hold the trigger as the cue climbs up the bomb fall line from the bottom of the HUD. If you are oriented correctly when it reaches the steering cue, the bomb will release automatically.
- Yell at your lasing buddy to make sure they're actually doing their job.
The CCRP release cue is generally accurate enough that a slight deviation will still let the bomb catch and guide on the laser. To improve the odds further, do the targeting and release in a 10-15° dive so the seeker is already pointing downwards.
Links and files
- Tippis' Checklist (see also kneeboard mods).
- Chuck's M-2000C guide at Mudspike.
- DCS: M-2000C by RAZBAM in the DCS shop.
Related DCS modules
- M-2000C Red Flag Campaign by Baltic Dragon.
More information
- Dassault Mirage 2000 on wikpedia.
- Mirage 2000 (Dassault-Breguet) on globalsecurity.org
- Bunyap's Test Flight - DCS: Mirage 2000C video series.


