F-5E-3 Tiger II
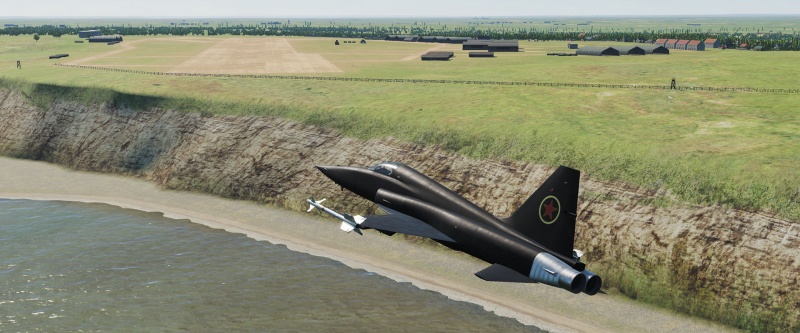
Ah, yes. the MiG-28, with its classified 4G negative dive. You definitely should try doing that — the wings will even stay on and everything (until you hit the ground).
More sensibly, the F-5 is based on the same basic airframe as the venerable T-38 Talon jet trainer, and remains in use to this day as a stand-in for lighter “red force” aircraft like the MiG-21 in dissimilar air combat training. Its numerous export (and later re-imported) versions have received layers upon layers of alterations and modernisations, with some variants being able to carry AMRAAMs, AGM-65s, and even laser targeting pods. Seeing where it ended up, it is not difficult to imagine the F-5 as a kind what-could-have-been alternative to the F-16: a small and light but very extensible airframe that you can bolt almost anything to. But all those extra features are for export and for much later periods — no such luxuries for pesky DCS pilots to enjoy.
Instead, the F-5E-3 featured here comes with very simple avionics and with a single pair of Sidewinders as its only air-to-air weapon (well… aside from a pretty competent pair of 20mm cannons that is). In fact, the F-5E-3 is almost completely devoid of “systems” to manipulate or to care about, and is therefore a superbly simple aircraft to fly and operate. It is small, while not incredibly fast, it can still go past Mach 1 and even carry a few stores with it while doing so. It is a light-weight, agile day-time multirole aircraft with a couple of simple pilot aids, but where most of the flying, navigating, and fighting has to be done by the pilot on their own.
Features
Aside from the obligatory MiG-28 skin, the F-5E-3 only comes with the bare minimum:
- A single UHF radio and a TACAN receiver as its only “advanced” navigational instrument.
- A somewhat temperamental RWR that likes to not show what is actually out there.
- Automated flaps and yaw/pitch stability enhancers, but no flight automation — only trim and a light hand to stay straight and level.
- A drag chute and an arrestor hook for (very) short landings. It is technically not carrier-capable, buuuuuut…
- An almost entirely pointless radar (ok, it helps with gunnery and lets you find targets BVR, but that is about all it is good for).
Flying the F-5E-3
The features list may look negative but that is because one key detail it is left out: the F-5E-3 is an absolute joy to fly. There is nothing to get between the pilot and the aircraft, and it does exactly what you tell it to, not what it thinks that maybe you meant to do. The pilot has to figure out where to go and how to get there, not just follow lines and cues on an automated map.
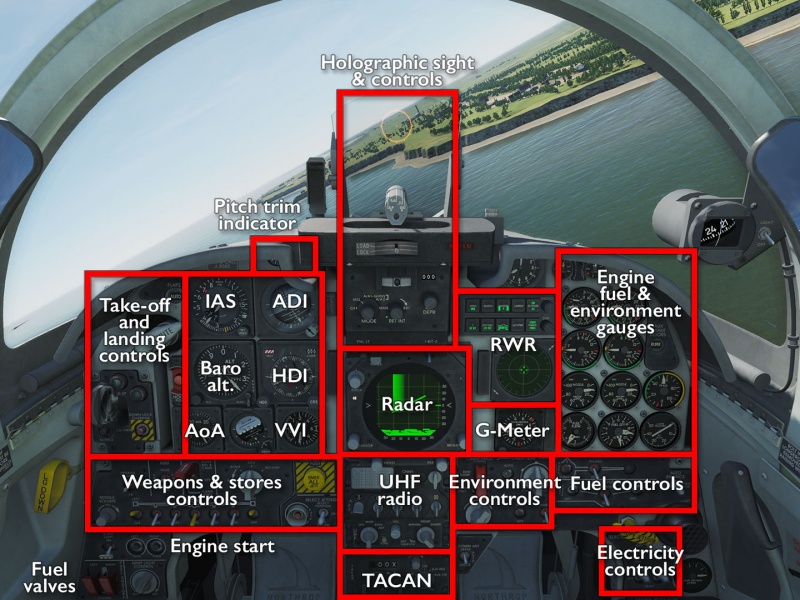
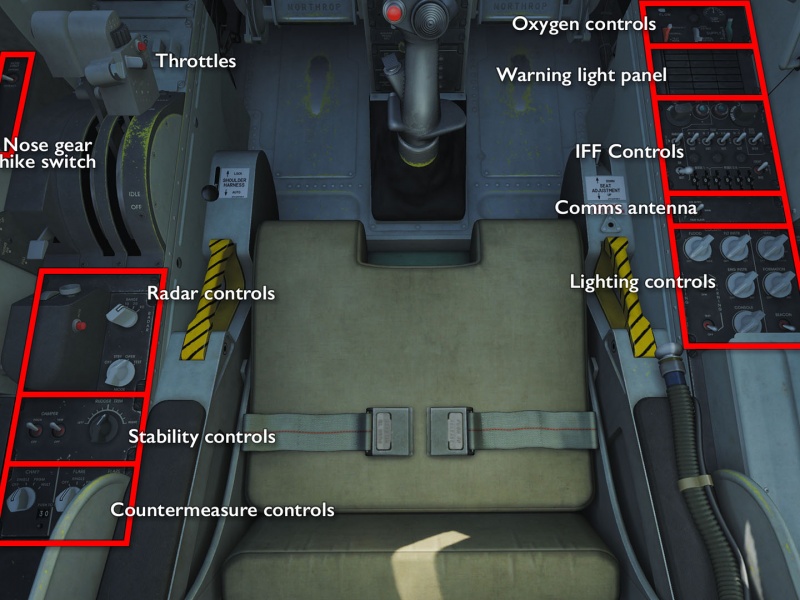
Cockpit overview
Getting into the air
One major upside of the simplicity of the F-5E-3 is that it can get into the air very quickly. There is no need to wait for alignment or data transfers — just get the engines running and go. The downside is that it needs outside help to do this since it does not feature an APU.
- Turn on batteries, generators, fuel pumps and oxygen.
- Request ground air supply connection and application.
- Move left throttle out of detent and press its engine start button, then wait for the engine to spool up.
- Request a second ground air supply application (ground crew will move it to the right side on their own).
- Repeat for the right engine and then request that air be disconnected.
- Turn on stability switches and move the flaps thumb switch to the rear (auto) position.
- Check that air brakes are in for good measure..
- Hike up the nosewheel, set pitch trim to ~6° up.
- Press and hold the stick nosewheel steering button and make your way to the runway.
- Push throttle to go-fast position, take off, and pull your wheels in.
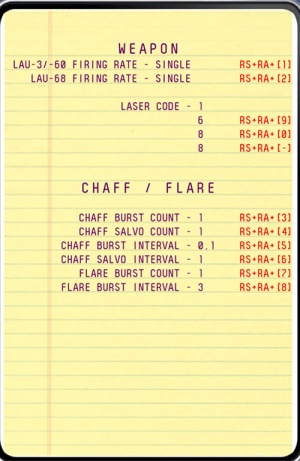
Even some FC3 aircraft require more steps than this. Now, if you also intend to go into combat, you will probably want to turn your RWR and countermeasures on, and also — before any of the above — go into your kneeboard and set up your chaff/flare release programs.
Shooting something
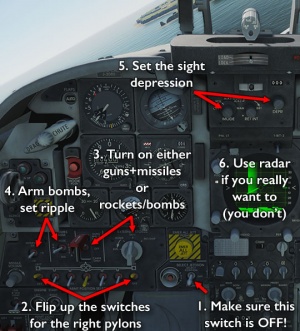
Like everything else, shooting things in the F-5E-3 is simple. Hitting can be hard, but the actual shooting is about as simple as it gets. It is also almost completely restricted to manipulating a single panel of well-marked switches and dials, with just one major potential snag.
- Make sure the Select Jettison switch is set in the middle Off position, and for good measure that the AG selector is set to “Safe”.
(This is probably the single most common stumbling block, and it happens a lot because you have flown with fuel tanks to the combat zone, jettisoned them on the way, and forgotten to reset this one switch.) - Move the switch corresponding to the pylon you want to fire to the On (Up) position.
- If you are using AG weapons, turn the friendly kitchen-stove dial to the right type of weapon.
- If you are using AA weapons, flip up the red cover and move the switch to the Guns/Missile/Camera (Up) position
Note: to use AA missiles, the AG bomb dial has to be in the upright “Safe” position. If you are jumping between AG and AA combat, this dial is effectively what switches from one to the other. - If you are employing bombs, set nose and/or tail arm switch to the correct position and also check the ripple interval.
(Invariably, “the right position” means the rightmost Nose/Tail setting.) - Set the holographic sight to the correct mode and setting:
- MSL for missiles.
- A/A1 (manoeuvring target) or A/A2 (constant rate target) for guns.
- MNL for AG weapons — consult kneeboard and manual for the correct sight depression setting.
- Put pipper on target (and uncage the AIM-9s if you are using those).
- Pickle.
Note that there is no “Master Arm” switch — it is all a matter of completing a circuit so the right firing signal can reach the right pylon, and anything that breaks that circuit will cause the weapon not to fire. In particular, note that the select jettison switch takes precedence over all other switches, and the AG weapon selector takes precedence over the missile selector.
Also note that, while the F-5E-3 has a radar, it is most useful for finding targets BFR, and even in that role, it is only really useful for finding large bomber formations and the like. In actual combat, it can certainly be used to control the AIM-9 seeker head or to provide predictive ranging for the A/A1 gun sight mode, but this usually requires more fiddling than it is really worth. In fact, leaving the radar on and activating (accidentally or otherwise) any of the special search modes locks the fire signal into gun/missile mode, which means you cannot release any AG weapons until you cancel that mode or just turn the radar off completely.
Smart weapons?!
The keywords for the F-5E-3 so far have been “simple” and “no fancy equipment for you!” In spite of that, the dirty secret of the F-5E-3 is this: it is an excellent platform for laser guided bombs. It can carry four GBU-12:s; it can deliver them to the combat zone at high speed; and it can quickly climb to good attack altitude or move out of the danger areas of a lot of mobile anti-air. The main issue with all F-5E-3 ground attack is the lack of precision and the reliance on pre-calculated bombing tables that rely on strict speed/altitude/dive-angle release parameters. Using LGB:s circumvents almost all of that
What the F-5E-3 does not have is the actual laser itself — someone else, be it JTAC or a buddy-lasing A-10C or AV-8B needs to bring that piece of the puzzle. Preferably, they should bring some smoke as well so you know roughly where to aim. With those assets in play, though, a GBU-12 attack in the F-5E-3 is easy as pie.
Setting up for an attack run starts on ground, with the engines off. Bring up the kneeboard by pressing RShiftK and use the [ and ] keys to find the ground settings page. Here, you can use RShiftRAlt9, RShiftRAlt0, and RShiftRAlt- to to adjust the bomb laser code. Note: This cannot be done in-flight. If playing with humans rather than AI, it is generally better that you set this to something unique, and they adjust their laser codes to match yours.
For the actual attack run itself:
- Select the correct pylon(s).
- Set bomb arming to “Nose/Tail.”
- Set sight to MAN mode and dial in 100 mil sight depression.
- Turn AG weapon selector to “Bomb.”
- Dive on target at a 15-20° angle.
- Aim to achieve 400+ knots at 4,000'+ above the target.
- Release when the target is inside the aiming circle (if the spotter is nice, there will be smoke there — just aim for the smoke).
Sip on something refreshing until the spotter declares target destroyed and has a new one lased.
Links and files
- Tippis' Checklist (see also kneeboard mods).
- Chuck's F-5E-3 guide at Mudspike.
- DCS: F-5E Tiger II by Belsimtek in the DCS shop.
Related DCS modules
- DCS: F-5E Black Sea Resolve ′79 Campaign by SorelRo
- F-5E Aggressors Basic Fighter Maneuvers (BFM) Campaign by Maple Flag Missions.
- F-5E Aggressors Air Combat Maneuver (ACM) Campaign by Maple Flag Missions.
More information
- Northrop F-5 on wikpedia.
- F-5E/F Tiger II on globalsecurity.org
- Bunyap's Test Flight - DCS: F-5E Tiger II video series.


