Mi-8MTV2 Magnificent Eight
Take your average inner-city commuter bus. Now strap two honking great engines and an even greater and more honking rotor to it. Then strap rockets to it. No, more rockets. Oh, and go to your local CB:s-Я-Us switch wholesaler and buy out their entire stock to use as interior decoration. Congratulations, you now have yourself an Mi-8MTV2 — the not-yet-militarised version of the Mi-17 Hip, and one of the most common helicopters in the entire world.
In the DCS world, it is not quite as common because it is, after all, simply a very large transport helicopter that you just so happen to be able to strap some weapons pods onto. The bus comparison is a bit unfair — the Mi-8MTV2 can be a surprisingly fast and agile helicopter — but the engine and rotors that gives it that speed and agility are work horses. They are built to haul heavy loads over long distances, not to duck and weave in tight spaces, and they are slow to respond to throttle and collective inputs. The simile is more that of a 1500+ Hp diesel engine than a 500Hp V8.
Features
The Mi-8MTV2's core task of “go to place; drop off stuff” is readily apparent when looking at its feature list:
- Five different radios (R-863 VHF, R-828 FM, YaDRO-1A HF, ARK-9, ARK-UD), most of which are used for direction-finding and homing rather than for communication.
- DISS-15 doppler navigation and hover/drift indication.
- A subtly competent autopilot.
- Semi-automated cargo slinging, including a special cargo view to spot your pick-up and drop-off point.
- Roughly four bajillion circuit-breaker switches.
- Enough panels and things to monitor to occupy a crew of three (pilot, co-pilot, flight engineer), but no way of multi-crewing it so you have to manage it all by yourself.
- More rockets, grenades, and miniguns than you could possibly ever need, and also bombs and auto-cannons.
Comes with the built-in Spring Tension campaign.
Flying the Mi-8MTV2
Flying the Mi-8MTV2 can be summed up in three letters: R, P, and M. This little bird bus lives or dies by the pilot's ability to maintain a steady high RPM by not asking the engine to do too much at the same time. The two TV3 engines can deliver a lot of power but will require time to do so, and will drop RPM if they get behind the curve. Dropped RPM, in turn, means a loss of electric power from the generators, and a loss of lift from the rotors.
This loss of electricity (and consequently of powered pilot aids) and the loss of lift will easily combine into a very disorganised ride down, but the aircraft can usually power out of it if enough speed, altitude, or just plain old time is available for the engine to sort itself out. Unfortunately, such a loss of RPM usually originates from the simultaneous and numerous high demands that come from take-offs and landings — situations where speed and altitude are low, and you do not have a whole lot of time until the trees grow uncomfortably large outside the cockpit windows.
The upside is that the Mi-8MTV2 is most commonly employed from airfields where it can employ running take-offs and landings. This means it can build up speed (or not slow down) while also having to worry about maintaining altitude, which bypasses the whole problem almost entirely. Even when low speed or hover transitions are required, the airframe will give ample warning that things are about to require extra attention. It goes through a period of significant and noisy cockpit shudders at around the 80km/h IAS mark as it starts to lose translational lift — this is an unmistakable signal that some proper RPM management is required.
Cockpit overview
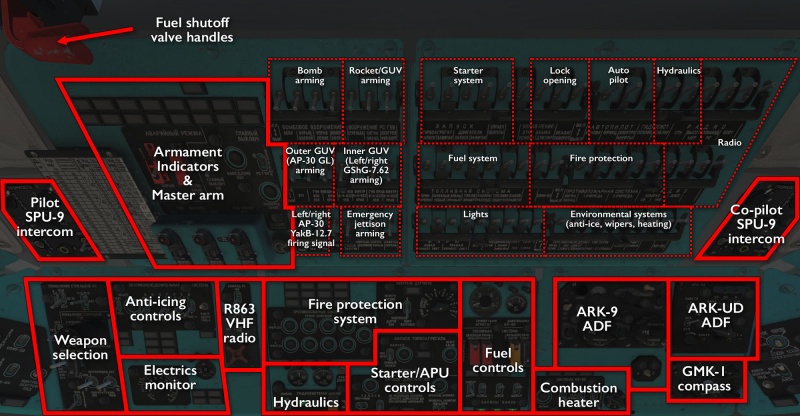
The first thing that usually strikes a new pilot stepping into the Mi-8MTV2 cockpit is that someone seems to have shotgunned the ceiling with circuit-braker switches — indeed, any time anyone talks about this module, it is likely the first thing that will come up.
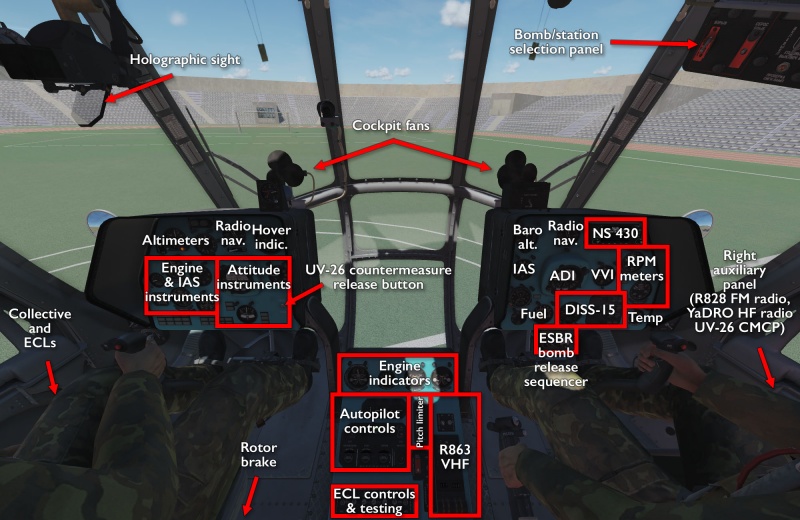
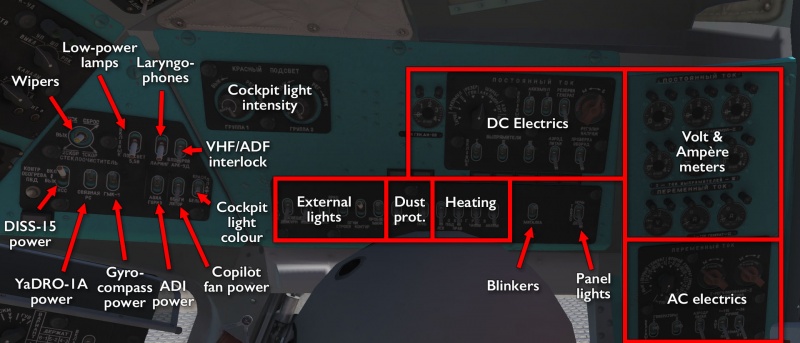
In spite of that first impression and reputation, however, the Mi-8MTV's cockpit is very well-organised and sensibly laid out. The infamous CB:s are clustered in clear groups, and the pilot, co-pilot, and flight engineer have direct and easy access to the things they should be dealing with: the pilot controls the flight instruments and the sling-loading; the co-pilot handles navigation and communication; the flight engineer monitors engines and electrics from the centre console and the side consoles. Most of those imposing rows of switches are flipped en masse at the very beginning of the start-up procedure and then never touched again.
The one major exception is the employment of weapon systems, which is… a mess. The controls for them are still grouped, of sorts, but are nevertheless spread out to the point where all three crew members have to get involved before anything aggressive goes flying down-range. The co-pilot has to decide which pylons get the firing signal. The engineer has to make sure the systems are powered. The pilot has to select the appropriate system to fire, and set it up in a less than transparent way.
While the layout is reasonably good and logical, weapons management aside, it is generally advisable to get a high-quality cockpit livery for a language that the pilot understands, since finding the right switch or button can be a bit messy otherwise. Two particularly good arguments for this slight modding are the start and fire protection panels, where, in the first case, there are multiple ЗАПУК (Start) buttons and switches where the correct order is obvious if you read Russian and anything but if you do not. In the second case, flipping one innocuous switch at the wrong time can disable the entire aircraft because now the engine is full of extinguishing fluid — not understanding the label that says so can make for some embarrassing moments.
Getting into the air
As with many other full-sim DCS aircraft, getting the Mi-8MTV2 started can be a long process, but unlike most of them, this is not because of some complex systems that need to be initialised — instead, there's simply a lot of stuff to turn on, and doing it out of order can overload the electrical system or run down the batteries in very short order.
As is often the case, there is a RWinHome “cheat” keyboard shortcut that runs through the startup process for you, but in the case of the Mi-8MTV2, it is actually somewhat unreliable. There are a number of outside parameters, such as wind and temperature, that can alter the timing of how the engines get going that the script might simply fail to do so. There are numerous good guides and checklists that run you through the process, though, and the module itself even comes with a built-in one — the main steps are listed on the kneeboard, and you can make an AI copilot run through the list for you, telling you what to do next.
The full procedure is far too long to describe here, but the general gist of it is:
- Making sure wheel brakes are on and the rotor brake is off.
- Turning on batteries and inverters.
- Turning on all the circuit-brakers on the left side of the ceiling using the handy lifting tabs.
- Turning on fire protection.
- Turning on fuel and boost pumps, opening fuel shut-off valves.
- Putting the APU into starter mode and pushing its start button, then waiting for it to spool up.
- Turning on the engine starter, selecting an engine, and pushing the engine start button.
- Move the fuel shut-off lever in the ceiling forward as the engine spools up.
- Repeating the process for the other engine.
- Throttling up once both engines are up and running, and setting the ECL levers to the middle/auto position.
- Turning on generators, inverters, and rectifiers now that there is something to produce AC power.
- Using that AC power to turn on any remaining systems one might want to use.
- The usual helo stuff of ground trimming to avoid uncontrolled tipping over or yawing, and then making your way to the runway… or try a vertical take-off because rolling starts are for the feeble.
Shooting something
The Mi-8MTV2 is first and foremost a transport and lifting helicopter, but obviously, this means that it can lift a downright obscene amount of weapons — some of them can even be made to fire in a reasonably appropriate direction. The process for getting there is fairly complicated, however, and can get really mind-bending if you bring along bombs and need to figure out the right sequencing to have them drop in the right order.
More commonly, the Mi-8MTV2 is equipped with a combination of rockets and gun/grenade pods, and the layout of the controls make it readily apparent that this is indeed intended to be on of, if not the most obvious loadout. The process for getting everything going requires all three crew-members to do something at their respective stations:
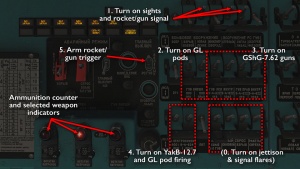
- The engineer has to power the weapon systems and arm the trigger.
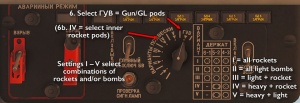
- The co-pilot has to select the appropriate weapon pylon and firing signal.
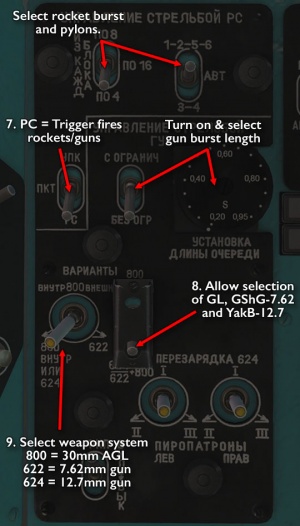
- The pilot has to select the specific weapon system, and do the actual flying, aiming, and firing.
This is perhaps the most readily obvious scenario that illustrates that, switch frenzy notwithstanding, there is a logic — if perhaps an obsessive need to control specific details — to how the systems are laid out. Let us, for instance, try to ready that standard loadout.
The engineer's job: activating the systems
Dive into the rightmost portion of the overhead maze of switches and turn on the ones that control the weapon systems you are carrying (or just all of them because it does not actually hurt to do so).
- Turn on the general armament controls.
- Turn on the left and right AG-17 grenade launchers (800 ЛЕВ, 800 ПРАВ).
- Turn on the individual left and right GShG-7.62mm guns on the left and right side (ЛЕВ/ПРАВ 622 ЛЕВ/ПРАВ).
- Turn on the firing electrics of the left and right AG-17 and YakB-12.7mm guns (ЕЛЕКТРОСПУСК 800; 624 ЛЕВ/ПРАВ).
- Arm the rocket/gun trigger (РС ГУВ).
The co-pilot's job: selecting the pylon
Below the co-pilots triangular panel hangs the bomb control panel, which, as one might suspect, controls bombs, rockets, gun pods, and selective jettisoning… A handy little table shows off which modes on the dial activate which pylons for the purpose of using a specific weapon type. The most important ones are usually the ГУВ setting, which selects gun pods, and position IV (or position I), which activates rocket pods on the inner pylons. Thus:
- Turn the selector dial to ГУВ.
The pilot's job: selecting the weapon
All weapons aside from bombs are managed through the pilot's overhead panel. While not strictly necessary, it may be good for the sake of completeness to specify exactly which rocket pylons to use, and whether or not you want different burst lengths. That hard decision aside, the pilot needs to:
- Turn the trigger selector to РС to ensure the trigger actually fires rockets and guns.
- Ensure that the 642/622+800 switch is down and locked to allow free selection of YakB, GShG, and the AG-17.
- Use the three-position switch to select one of the three weapons to use.
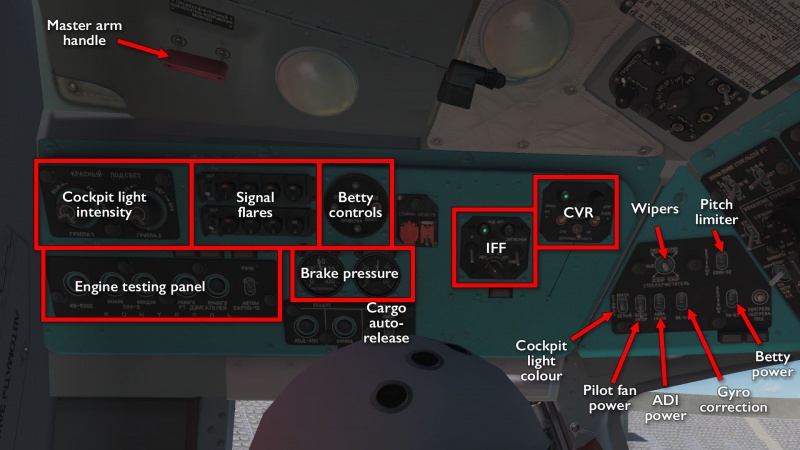
- Pull on the tiny red master-arm handle on the ceiling above and behind the pilot's head.
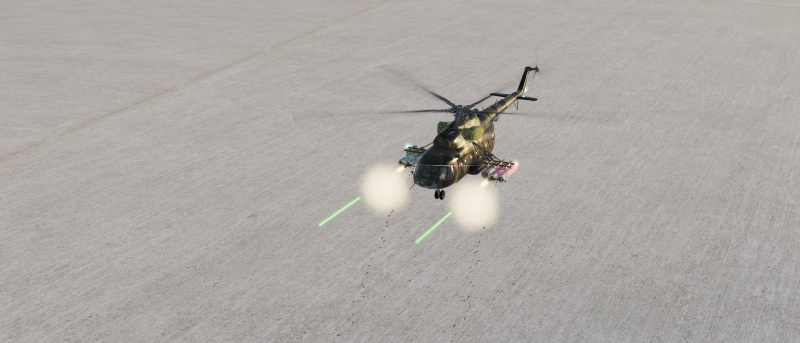
…now, if only there was multi-crew so you did not actually have to do all of that on your own. Have a sip after all that switch-flipping, because all that is left is the lesser problem of making rounds fall where you want them to. From here on, the weapon selection is a matter of picking different positions on the three-way switch and going between the ГУВ and IV positions on the bomb control panel dial. For the pods, the currently selected weapon will display its ammo count and selection lamp on the overhead panel. Also, remember to flip up the cover on the stick РС trigger button.
It is all fine and dandy to have five homing radio receivers, except for one little problem: they require a radio homing signal to receive. If you are the first to go somewhere, or want to be stealthy, or just want to deliver something in the middle of nowhere, chances are that there will not be anything of the kind waiting for you, and that even if there were, the signal would be blocked more often than not.
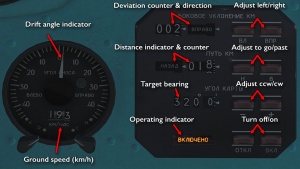
Enter the ДИСС-15 doppler navigation system, using ground sensing doppler radar to continuously calculate the Mi-8MTV2's movement across the ground or sea beneath it, and using this as a basis for determining its position relative to a fixed starting or ending point. If you intend to play the Oilfield campaign, you need to familiarise yourself with this mode of navigation since the exploration spots you are trying to track down (in various terrains and visibility conditions) are only indicated by such relative positions.
The operating principle is rather similar to TACAN offset navigation: you dial in a desired bearing and distance and try to fly in the correct compass direction, following a course deviation marker to guide yourself to the right spot where all the dials and numbers line up.
To use the system (skipping the process of turning it on during start-up — refer to the manual, guides, and checklists for that) in the most straight-forward way:
- Make sure the measuring is currently turned off (indicator is not lit; the ОТКЛ button is pressed).
- Use the various adjustment buttons to zero out deviation and distance — if pressing a button makes the number go up, press the other button instead.
- Dial in the desired bearing from your current position.
If you pull a bearing from the F10 map ruler tool, remember to add or subtract the magnetic variation from the displayed heading: -6° on the Caucasus map; -2° on Persian Gulf; -12° on NTTR. Over longer distances (200km+) it may help to get a more exact magvar value for your starting airport. - Press the Н button to dial in the distance to go to reach the desired end point.
(If you want to backtrack to a point of origin, and know that you are a specific distance and bearing away from that point, you can use the В button instead to dial in that distance). - Press the ВКЛ button to start dopplering.
To get to where you intend to go, use the compass to fly in the desired direction, while keeping an eye on the drift angle indicator. Just because you are pointing, and apparently flying, in a specific direction does not mean this is your total direction of travel — the the drift angle indicator will tell you if you are being blown (or sloppily flown) off course, and the deviation counter tells you how many km to the left (ВЛЕВО) or right (ВПРАВО) you are off the desire track. If the drift angle shows zero, you are flying in a straight line, no matter what it looks like outside the window; and if the deviation counter shows 0km, you are staying on course.
If you are back-tracking (as set up using the В button), you obviously have to fly the opposite heading, but either way, you are trying to make the distance count down to zero, while maintaining zero drift and deviation at the same time. If you are doing a multi-leg trip, remember to stop, reset, and re-enter the new parameters at each turn. Ideally, this should be done while not moving.
Links and files
- Tippis' Checklist (see also kneeboard mods).
- Chuck's Mi-8MTV2 guide at Mudspike.
- DCS: Mi-8MTV2 Magnificent Eight by Belsimtek in the DCS shop.
- Airgoons Mi-8MTV2 tutorials playlist.
Related DCS modules
- NS 430 Navigation system, and in particular the NS 430 Navigation System for Mi-8MTV2.
- The Border Campaign by Armen Murazyan.
- Mi-8MTV2 Oilfield Campaign by Dmitry Koshelev.
- Mi-8MTV2 and Ka-50: Memory of a Hero Campaign by Stone Sky (owning both helo modules is required).
- DCS: Mi-8MTV2 Crew Part 1 Campaign by Stone Sky
More information
| DCS World | |
|---|---|
| Helicopter modules (full sim) |
Ka‑50 Black Shark 2 · Mi‑8MTV2 Magnificent Eight · Mi‑24P Hind · SA342L, M, Mistral, and Minigun Gazelle · UH‑1H Huey |


