|
|
| (12 intermediate revisions by the same user not shown) |
| Line 3: |
Line 3: |
|
| |
|
| Much like [[DCS_Reference/Labels|custom labels]], [[Digital_Combat_Simulator|DCS']] weather system is a heavily obfuscated and largely opaque, but also very capable part of the simulation. The biggest problem with is that, while there is a dynamic weather tab in the mission editor, it exposes roughly none of the capabilities of the system and trying to use it via the editor relies entirely on random chance to create some desired effect using parameters that ''simply cannot'' produce them. | | Much like [[DCS_Reference/Labels|custom labels]], [[Digital_Combat_Simulator|DCS']] weather system is a heavily obfuscated and largely opaque, but also very capable part of the simulation. The biggest problem with is that, while there is a dynamic weather tab in the mission editor, it exposes roughly none of the capabilities of the system and trying to use it via the editor relies entirely on random chance to create some desired effect using parameters that ''simply cannot'' produce them. |
|
| |
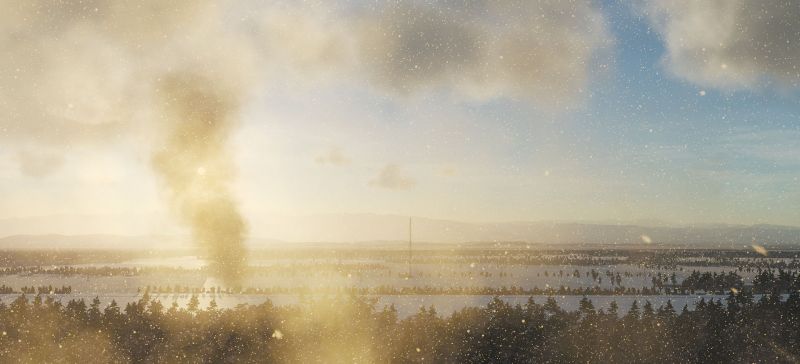
| A complete lack of control combined with a being completely unfit for purpose is a great way to dissuade the aspiring mission maker from ever using the dynamic weather system, instead relying on the much more immediate and obvious static weather. This guide aims to demystify the capabilities of the dynamic weather available in DCS. With only a little bit of practice, situations like the one depicted at the top of the page: gentle snow falling in light breezes from heavy clouds, with clear skies on the horizon. This is a weather state that simply cannot be achieved through the use of the mission editor alone.
| |
|
| |
|
| {{tocright}} | | {{tocright}} |
|
| |
|
| == Tools and workflow ==
| | A complete lack of control combined with a being completely unfit for purpose is a great way to dissuade the aspiring mission maker from ever using the dynamic weather system, instead relying on the much more immediate and obvious static weather. This guide aims to demystify the capabilities of the dynamic weather available in DCS. With only a little bit of practice, situations like the one depicted at the top of the page — gentle snow falling in light breezes from heavy clouds, with clear skies on the horizon — become a breeze to recreate. This is a weather state that simply cannot be achieved through the use of the mission editor alone. |
| To create good, deliberate dynamic weather systems, you ''absolutely'' need the following:
| |
| * A good zip manipulation tool — editing dynamic weather is almost entirely done by directly doing manual edits to the mission definition stored inside a .miz file, and those are simply zip files with a different name. You will need something that lets you seamlessly browse, extract, and add to the file structure of a zip file. Windows' own Explorer only goes half-way since it can only explicitly handle .zip files, not the exact same file with a different extension.
| |
| * [https://notepad-plus-plus.org/ Notepad++] or a similarly competent text editor. No, not notepad. Ideally, the editor would have zip-browsing functionality built in, but there are some actual advantages to separating the file extraction from the file editing.
| |
| * A conversion tool for angles and distances (Windows 10's built-in calculator does this well enough).
| |
| * Patience.
| |
| * Patience.
| |
| * Possibly the [[#Weather_editing_with_CombatFlite|CombatFlite package]] described at the end of this page.
| |
| * Patience.
| |
| | |
| You need these because the basic flow of weather creation is one of:
| |
| * Creating a dummy mission where you place trigger zones as a first approximation of the pressure fronts.
| |
| * Extracting the “mission” Lua file from the dummy .miz.
| |
| * Opening the mission file in your text editor of choice.
| |
| * Copying the trigger zone coordinates (and possibly sizes) to a weather parameters.
| |
| * Re-inserting the edited mission file into the .miz.
| |
| * Reload the mission.
| |
| * Preview, hate actual result.
| |
| * Start over.
| |
| | |
| In particular, the whole use of a dummy mission is an important step because tweaking weather patterns will require a lot of back-and-forth between editor and in-game, a lot of reloading of the mission, and a lot of placing otherwise pointless objects around the map to observe the weather effects in different areas. If this is done in a pre-existing mission, the processes of reloading and entering the mission will add up to a lot of time wasted on waiting, and you will also be manipulating a much more evolved and complex mission file where you risk breaking the entire mission because of a careless edit. Much better to do this in a preview dummy and then importing the weather alone, than ruining all the mission-making hard work that goes into creating a complete mission.
| |
| | |
| == General considerations ==
| |
| While dynamic weather can do a lot of very fancy things that you do not often see in DCS, getting into weather editing comes with a number of caveats and restrictions that one needs to be aware of before starting anything.
| |
| | |
| === Prerequisites ===
| |
| The descriptions on this page assume that you are already familiar with the basics of the DCS mission editor: how to place units and static objects, how to create and manipulate trigger zones, and where to find your personal collection of mission (.miz) files.
| |
| | |
| [[File:MapsOptions.png|thumb|right|Setting up the mission editor display options for weather editing.]]
| |
| | |
| For the sake of clarity, these will be referred to as .miz files from here on, as the main file where weather manipulation will happen is simply called “mission” — a lua file without the usual .lua extension. As such, to try to keep the confusion between a “mission file” and ''the'' “mission” file at a minimum, .miz files will be called just that, whereas the lua file will be called the ''mission'' file. Clear as mud.
| |
| | |
| The reader is also expected to already know how to use their zip and text editing tool, and in the case of Notepad++ how to set it to show Lua syntax — this helps in editing the ''mission'' file, but since it lacks the regular .lua extension, Notepad++ will not automatically apply the correct syntax highlighting. Similarly, the reader is expected to be familiar enough with the mission editor to change the different map display options and not be completely lost in the process, since weather is most easily edited with almost all map markers except “user objects” turned off.
| |
| | |
| === Limitations ===
| |
| There are three main limitations of the dynamic weather system to be aware of:
| |
| * It works using elliptical (anti)cyclonic pressure systems that work best if they are kept to a reasonably small size. Making these systems large will spread out and weaken the effects, but will still display large pressure differences. Trying to get a significant weather effect requires ramping up the pressure difference to combat the weakening and spread, but that will also inherently mean that pressure will vary wildly and create ridiculous winds. Consequently, dynamic weather is far more suited for small (~100nm across) localised effects than something that covers the whole map — if that is what you want, static weather is usually a much better option.
| |
| * There is no currently known way of changing cloud layer altitude and thickness. Dynamic weather clouds will develop at roughly 8–10,000' MSL no matter what, which means you cannot really tune it to create, say, low-altitude clouds over Normandy, or high-altitude clouds over the Iranian or Navada highlands. The weather parameter names tease the ability to set a pressure system y-value to go along with the x- and z-axes, and while adding such a parameter does not crash anything, it also does not seem to have any effect whatsoever. Similarly, there is seemingly no way to directly control different wind layers with dynamic weather the way you can with the static model — you cannot set up separate surface, low- and high altitude wind velocities.
| |
| * The UI for editing dynamic weather is not only almost completely lacking, but the editor preview of the effects is not very detailed, nor entirely accurate. Actual in-game wind directions and strengths will often be off by a few degrees from what the preview suggests, and will only show with roughly 125km resolution — wind shifts can happen on much smaller scales than this and will not show up in the editor. Unfortunately, this is at odds with how dynamic weather is more suited for smaller pressure systems, as mentioned above. When manipulating a lot of smaller pressure zones, it can often be difficult to see the exact flow of the air currents in and around these areas. Only through testing and observation of in-game smoke effects and windsocks can the actual winds be determined. Hence the need for all that patience while the weather setup is being tested.
| |
| | |
| Something that may ''look like'' a limitation is the inability to set QNH (sea-level pressure). This is actually fully intentional as dynamic weather always uses standard atmospheric pressure (1013.25 hPa / 760mmHg / 29.92 inHg) as its baseline, and local and regional deviations in QNH are a result of the pressure fronts that form the basis of the dynamic weather system.
| |
| | |
| === Units ===
| |
| One of the more annoying and initially confusing things about editing weather in DCS is that different units are used for different parts of the UI, and you will need to know what units are used where to get the results you want. This is doubly true since the best method of manipulating weather is by using trigger zones as stand-in objects, which themselves cannot quite decide what units to use.
| |
| | |
| [[File:TriggerZone.png|thumb|right|The different units used in the trigger zone panels.]]
| |
| | |
| The long and short of it is this:
| |
| * The trigger zone editing panel uses ''feet'' to denote its radius.
| |
| * The trigger zone list shows the radius in ''meters''.
| |
| * The trigger definitions in the mission file describe their radii in ''meters''.
| |
| * There is no way to directly see the size of pressure zones other than using the {{Key|RClick}} measure tool, which gives distances in ''nautical miles'' and angles in ''degrees''.
| |
| * Pressure zone definitions in the mission file describe their radii in ''meters''.
| |
| * Pressure zone ellipticity is expressed is a simple width-to-height ratio multiplier.
| |
| * Pressure zone rotations are expressed in ''radians'' (from -π to +π).
| |
| * Trigger and pressure zone coordinates in the mission file are expressed in ''meters''.
| |
| * Map coordinates an be changed to display in X/Y ''meters'' by pressing {{Key|LAlt}}{{Key|Y}} to cycle through the various coordinate modes.
| |
| * Pressure zone excess is measured in the difference in ''Pascal'' from standard atmospheric pressure (101,325 Pa).
| |
| ** Note that most metric altimeters measure in ''hecto''pascals — i.e. hundreds of Pa — so a -100 Pa pressure excess equates to -1.00 on the altimeter.
| |
| ** Likewise, ±100 Pa = ±0.75mmHg = ±0.03 inHg for Russian and imperial altimeters.
| |
| | |
| For the most part, there is no need to worry about the coordinate display since copy-pasting them from trigger zones is the easiest way to precisely position pressure zones, and the mission editor already displays those positions readily enough.
| |
| | |
| === Performance and bugs ===
| |
| Historically, there has been a lot of discussion of the performance impact of dynamic weather, especially in relation to the much simpler static weather alternative. Intuitively, static weather should be much easier to calculate, whereas dynamic weather requires constant checking against the weather parameters to figure out the local weather — exponentially so when multiple pressure fronts are used. This latter assumption in particular would be a strong argument against using multiple pressure systems to compensate for the previously mentioned issue with using dynamic weather mechanics over large areas.
| |
| | |
| However, [https://forums.mudspike.com/t/dcs-dynamic-weather-performance/7764 player testing] suggests that dynamic weather actually creates ''lesser'' performance issues than static weather, although this may simply be a matter of local graphical rendering of that weather than the weather simulation underneath. The jury is still out on the actual effects and (potential) performance impacts of the two methods, but the testing that has been done at least shows that intuition might not give the right answer.
| |
|
| |
|
| Finally, there are numerous reports of syncing bugs in multiplayer (and some issues that even appear in SP maps). Most notably, cloud position is only something that happens client-side — an effect that equally holds true for static weather — so hiding from other players (and definitely from omniscient AI) underneath a cloud is far from guaranteed to work. The cloud might simply not be there on the other guy's screen.
| | == An introduction to dynamic weather == |
| | {{Main|DCS_Reference/Introduction_to_Dynamic_Weather|Introduction to Dynamic Weather}} |
| | The main shortfall of the dynamic weather system is, as mentioned, the lack of a UI. To compensate for this, mission designers who want to use dynamic weather will have to stock up on a number of external tools, and also be prepared to engage with a pretty long-winded iterative process of extracting and importing files from the .miz package that the mission editor creates. |
|
| |
|
| In addition, there are noticeable “spin-up” required before the weather effects fully kick in. This can be seen to some extent in single-player, where rain and snow might be whirling around at huge speeds, suggesting wind strengths and directions that are completely at odds with what smoke effects in the same area would show. This effect will usually settle down after a little while, and smoke and precipitation will agree on the local wind conditions after a minute or thereabouts. This simulation spin-up is most likely also the cause of reports where multiplayer weather outright does not show up for some player, especially when cycling through external views: they have presumably missed (or not fully waited for) the weather sim spin-up for their location, and therefore get nothing, at least visually.
| | Another way the lacklustre UI reveals itself is in the lack of cohesion in what units are used. To manipulate dynamic weather, you will need to do degree-to-radian conversions, nautical mile-to-feet-to-meter conversions, and lat/long-to-meter conversions. It also helps if you are familiar with how many Pascals go into a millimetre (or inch) of mercury. |
|
| |
|
| == Weather editing ==
| | While there are external mission editing suites such as [[DCS_Reference/Dynamic_Weather_in_CombatFlite|CombatFlite]] that can circumvent some of these steps, you will still be bouncing back and forth between external tools and DCS itself to fine-tine and preview the results as they appear in-game. If you don't want that full package (and for some details, even if you do), you will need: a good zip manipulation tool, a unit conversion tool, a good text editor, and a lot of time and patience. You also need to already be familiar with the ins and outs of almost all mission editor tools. |
| Dynamic weather editing is mostly done in your chosen text editor, but you still need to keep the DCS mission editor open to do initial adjustments of pressure front locations and to do the preview and testing of the weather.
| |
|
| |
|
| With the right tools, you can just keep all files open at all times and never have to close anything down — Notepad++ will notice if a file has been updated and will give you the option to reload; good zip manipulation tools will similarly keep the zip file open and just notify you that its contents have been updated; and DCS… will not tell you anything, but you can just quickly reload the mission to include any edited parameters. So get your multitasking on and don't close anything since that just wastes time, and the editing process is time-consuming enough as it is.
| | One immediate consideration that always comes up when discussing the respective merits of static and dynamic weather is one of performance. Some testing has shown that it is not as clear-cut as one might expect, where static weather is “simple” and therefore less resource intensive. Rather, it seems like static weather may actually be easier to visually render client-side, and the jury is still out on the performance drain for the simulation as a whole (which matters more on the server end of things). |
|
| |
|
| === Mission editor weather UI === | | == Dynamic weather editing == |
| | {{Main|DCS_Reference/Editing_Dynamic_Weather|Editing Dynamic Weather}} |
| | There is an immediately obvious way into working with the dynamic weather system: the eponymous tab in the weather control pane. However, even in this tab, most of the controls have nothing to do with ''dynamic'' weather, as such, and of the few that actually engage with the weather dynamics, only two are of any actual constructive use — the rest are, if anything, ''de''structive in that they can instantly wipe out a lot of work with no benefit in return. |
|
| |
|
| [[File:DynamicWeatherPane.png|thumb|right|DCS Dynamic Weather controls.]]
| | The only two controls you want to use in the in-editor UI are the left-most box on the row labelled “systems quantity”, and the “pressure deviation” box. All other buttons and boxes — the “baric system” dropdown, the rightmost quantity box, and the “generate” button will all overwrite your work with randomised garbage, forcing you to reload the mission and try again. |
|
| |
|
| The first step in making dynamic weather is understanding DCS' weather UI. The reason why the weather system was described as opaque and obfuscated earlier starts here: there are two parts to the UI, where the most critical one offers no direct interaction, only visual feedback, and what ''looks like'' the key UI part actually only has two controls that are relevant to the process.
| | === Wind flags === |
| | |
| ==== The dynamic weather tab ====
| |
| Opening up the “''Time and Weather''” pane in the editor and clicking on the “''Dynamic''” tab presents you with the panel shown on the right. It consists of seven different sections, each with a number of controls:
| |
| * '''Start''', where you set the mission date and starting time. The time of year mainly determines the skinning of trees and of certain camouflaged units as far as what season colours they should be using. It ''does not'' determine the type of precipitation (rain or snow), since that is controlled by the temperature setting. Also note that some maps do not offer the full gamut of seasons — Normandy has no specific winter appearance, for instance.
| |
| * '''Conditions''', where you set the sea-level ambient temperature. Note that for maps where some airports sit at significant altitudes — Nevada and the inland parts of Persian Gulf in particular — the actual temperatures will be less than because of that altitude. Again, it is this value more than the time of year that determines whether you will see snow or not.
| |
| * '''Dynamic Weather''', where you set up (and to a very minute extent edit) your basic dynamic weather parameters. This section consists of four controls:
| |
| ** '''Baric System''', which is an almost wholly pointless dropdown. You can choose between ''cyclone'' and ''anti-cyclone'', and this only ever decides whether you will get a low-pressure (cyclonic) or high-pressure (anti-cyclonic) front if you decide to randomly generate exactly one pressure front. Since the whole point of the exercise is to edit these pressure levels manually, this drop-down serves absolutely no useful purpose whatsoever and can and should be ignored at all times.
| |
| ** '''Systems Quantity … of …''', is where you can set up how many different pressure fronts you want (rightmost number), and which one is currently selected (leftmost number). This is much the same setup as when editing vehicle groups. This control and the one below it is actually of some use if you want to interactively edit the pressure numbers in the editor rather than doing it manually in the text editor. However, changing the right-most (total number of systems) number will automatically randomly generate a new weather setup with the selected number, which means that anything you've been working on will be overwritten. As such, this control may be useful at the very start ''if'' you know exactly how many systems you want — at all other times, stay away from this field.
| |
| ** '''Pressure deviation''', where you set up the under- or over-pressure (in Pascals). Entering a negative number gives you low-pressure (cyclonic) region; entering a positive number gives you a high-pressure (anti-cyclonic) region. The fact that you can enter both positive and negative numbers and get your high/low-pressure zones that way is the reason why the Baric System dropdown is worthless: it creates the exact same thing, only with no control over the result.
| |
| ** '''Generate''', which should never under any circumstances be used. This button randomly generates a new dynamic weather setup based on the number of total systems you've selected in the controller above. These systems will invariably be too large; have far too high pressure deviations; be located outside the viewable map area so you can't see the effects; and will irrevocably overwrite any work you've done. If you accidentally push this button, you have screwed yourself over and need to reload the mission, taking care not to accidentally save anything. Stay away.
| |
| * '''Turbulence''', which works the same in both dynamic and static weather and sets the behaviour of the surface boundary level. Every unit equates to 0.1m/s of turbulence at ground level, which attenuates as altitude increases.
| |
| * '''Fog''', where you… set up the fog layer, if you want one. Like turbulence, this setting works the same for both dynamic and static weather.
| |
| ** '''Fog Enable''', turns fog on and off.
| |
| ** '''Visibility''' does exactly what one would expect: it determines the distance (in feet) that you can see through the fog at sea level. Note that the fog thins out at higher altitudes, so visibility will generally be unless you are starting from a carrier or attacking naval targets or something that sits directly on the beach.
| |
| ** '''Thickness''' again does exactly what it says on the tin: it sets the thickness (max altitude) of the fog layer measured from sea level. Again, note that in maps with high altitude regions, the thickness needs to be dialled up for the fog to show up in those regions.
| |
| * '''Dust Smoke''' creates a yellow-brown haze as opposed to the blue haze of fog, and is more meant to simulate dust being kicked up from desert areas and the like. It otherwise controls the same as fog, except that it always exist at a fixed thickness above the ground, as opposed to in relation to sea level.
| |
| * '''Weather Preset Controls''', which let you [[#Exporting_the_weather_parameters|select, load, save, and discard]] ready-made weather presets.
| |
| | |
| As one might notice at this point, most of the controls in the weather panel are of no use, or even outright harmful for dynamic weather editing. The only two controls that really matter are the field that selects the current pressure front, and the pressure deviation field. In addition, time, temperature, fog and dust can be interesting, but are not tied to the dynamic weather as such.
| |
| | |
| ==== Wind flags ====
| |
| [[File:WindFlags.png|right|frameless|Mission editor wind indicators]] | | [[File:WindFlags.png|right|frameless|Mission editor wind indicators]] |
|
| |
|
| Line 117: |
Line 31: |
| These flags are essentially arrows, with the round dot being the tip that points in the direction of the wind, and with the tail-end flag showing the strength using dashes and triangles. A half-dash is a 5kts wind; a full dash is 10kts; a triangle is 50kts. Add up the number of dashes and triangles to read the full wind value. | | These flags are essentially arrows, with the round dot being the tip that points in the direction of the wind, and with the tail-end flag showing the strength using dashes and triangles. A half-dash is a 5kts wind; a full dash is 10kts; a triangle is 50kts. Add up the number of dashes and triangles to read the full wind value. |
|
| |
|
| === Preparing a dummy mission === | | === Manual weather editing === |
| As previously mentioned, dynamic weather is best edited using a dummy mission with the sole purpose of creating and previewing the various pressure fronts and their effects on the local weather. There are a number of benefits to this methodology compared to trying to manipulate an existing mission directly:
| | Most of the actual ''editing'' of weather happens outside of DCS, by extraction the ‘''mission''’ Lua file from the .miz package you are working on and using a sensible text editor to manually adjust coordinates and sizes directly in that file. |
| * With only weather data, and perhaps a couple of static objects, the mission will be small, quick to (re)load into the editor, and quick to load for the in-game preview.
| |
| * The ''mission'' file that is used for most of the weather editing will also be small, short, and easy to navigate and manipulate in the text editor. It will also be quick and easy to extract and insert into the .miz file (although if the zip too you are using is good, this really should make such a small difference as to be imperceptible).
| |
| * You can experiments with all kinds of static objects (mostly smoke effects, wind socks) without cluttering up the unit data base and unit name dictionary.
| |
| * With only a handful of static objects to care about in the mission, you can use F12 to quickly cycle through different sites of interest on the map and check that the weather behaves the way you want at all those locations.
| |
| * Similarly, you can play around with numerous trigger zones without the risk of interfering with ones that are tied to actual mission triggers.
| |
| When all is said and done, you will simply end up with a weather preset that can be loaded into any existing or in-the-making mission, where ''only'' the weather data transfers without any of junk editing “scaffolding” that was employed to create that setup.
| |
| | |
| The setup of the dummy mission is as basic as it gets:
| |
| # Select the terrain you want to use. You ''can'' load weather profiles across different terrains, but the difference in coordinate systems will invariably make the weather appear in the wrong place.
| |
| # Clear the coalition list and just add one red and one blue coalition member — Russia and the US being the most obvious and flexible choices.
| |
| # Create the mission and save it under some clever name, such as “dummy weather.miz”.
| |
| # Figure out and set up what date and time you want for your mission. This ''will'' be exported with the weather data, and can cause a lot of confusion if you import that setup into a mission where you have set up a completely different starting time — suddenly, the moody autumn dusk mission will be in full summer sunlight.
| |
| # Figure out the approximate areas of interest where the action will take place and where the weather conditions will matter.
| |
| # Either place Windsock static structures or use a combination of some other structure alongside static smoke effects (most helpfully with the “big smoke” preset and 0.5 density) at suitable sampling points.
| |
| # Finally, go into the weather pane, switch to dynamic weather, and create new weather using exactly one (1) system. The results of this creation are wholly pointless and irrelevant since they will immediately be adjusted to something that works.
| |
| # With all the prep work done, save the mission.
| |
| | |
| The choice between wind socks and other static structures comes down to whether you just need a quick glance at the rough wind direction and weather condition, or if you want a bit more to go on. Wind socks are single objects that you can quickly move around in the editor if you want to check a new sample site, but they only give rough information about surface winds. For a better idea of how strong the winds are, and if there are any effects from turbulence, you want to use smoke effects, but those are not selectable using the F12 key — instead, you need some other static object near by to cycle to, but this means every time you want to check a new site, you have to move (or place) two objects: the smoke effect and the structure.
| |
| | |
| In addition, if you want to check the weather at sea, you pretty much ''have to'' use smoke effects, but be aware that these can sometimes decide to behave… oddly in relation to the water surface. Attaching them to ships can usually alleviate this, but even this can be buggy and behave strangely at times.
| |
| | |
| With these simple setup steps and general markers in place, the dummy mission is ready for the actual weather editing, which is mostly done using trigger zones in the editor, and using text editing outside of it.
| |
| | |
| === Using trigger zones to place pressure fronts ===
| |
| The most fundamental problem with dynamic weather editing in DCS is that it completely lacks any interactive component to the visual elements on-screen. The editor will happily show you pressure zones and some vague approximation of their effects, but offers no way to actually interact with them other than changing the pressure differential.
| |
| | |
| For this reason, we have to resort to the one thing that offers exactly that interactivity and which as luck would have it also operates on the same coordinate systems and (mostly) the same units as the pressure fronts: trigger zones.
| |
| | |
| Zones can be dragged around and resized with immediate on-screen feedback. You can use them to preview how the fronts will sit in relation to the world and to each other; whether there will be (or should be) any overlaps; and (over time and with experience) get a sense for which areas will be affected by dynamic weather and which will not. You can then use these positions and sizes to adjust the pressure fronts in the mission file and be very sure that the result will precisely match the preview. Or at least precisely enough, with a couple of limitations.
| |
| | |
| ==== Limitations ====
| |
| Being trigger zones rather than the actual pressure fronts, a couple of inherent limitations to this preview and editing methodology needs to be understood:
| |
| * You obviously do not see the actual wind indicators until after the zone parameters have been transferred to the weather data in the mission file.
| |
| * Trigger zones are always circular, whereas the pressure fronts are actually ovals that can be rotated to point in different directions. Note, however, that the ''weather previews'' are also always circular, even for oval pressure systems, which means that the zone display and the pressure front display will agree, but the actual resulting winds will show a different picture.
| |
| * There is no inherent connection between the zones and the weather — it is all done manually — so every change to a trigger zone will require a new round of mission file extraction, editing, re-insertion, and reloading.
| |
| | |
| === Manipulating pressure fronts ===
| |
| [[File:DoubleZones.png|thumb|right|Creating multiple weather fronts.]]
| |
| | |
| === Exporting the weather parameters ===
| |
| | |
| == Pressure front parameters ==
| |
| | |
| === Location and size ===
| |
| | |
| === Pressure excess ===
| |
| | |
| ==== High- and low-pressure areas ====
| |
| | |
| === Shape ===
| |
| | |
| ==== Ellipticity ====
| |
| | |
| ==== Rotation ====
| |
| | |
| == Combinations ==
| |
| | |
| [[File:TwoFonts.jpg|800px|frameless]]
| |
| | |
| == Specific weather patterns ==
| |
| | |
| === Cloud fronts ===
| |
|
| |
|
| === Rain and snow ===
| | These values can be copied from trigger zones that you place as a sort of preview of the pressure systems you want to create, after which the mission file can be re-imported into the .miz file and the results can be previewed in the mission editor and in-game. Even in the simplest case, it is a fairly involved process and [[DCS_Reference/Editing_Dynamic_Weather|the full-length section]] on weather editing goes into more detail of the various steps involved. |
|
| |
|
| === Low winds ===
| | The circuitous process of editing weather, requiring a number of different “scaffolding” mission objects such as dummy trigger zones and the use of static objects to observe the effect, means that it the whole process is best done in a separate dummy mission. The good news is that once all that work is done, it is trivial to export the resulting weather setup and import it into any number of existing or future missions. |
|
| |
|
| === Long winds === | | == The technical details: pressure front parameters == |
| | {{Main|DCS_Reference/Pressure_Front_Parameters|Pressure Front Parameters}} |
|
| |
|
| <gallery>
| | == Advanced dynamic weather editing == |
| TriSnowParameters.png|Parameters for a calm snowy day.
| | {{Main|DCS_Reference/Advanced_Dynamic_Weather|Advanced Dynamic Weather}} |
| PatchySnow.jpg|Mission editor appearance.
| |
| </gallery>
| |
|
| |
|
| == Weather editing with CombatFlite == | | == Weather editing simplified: CombatFlite == |
| | {{Main|DCS_Reference/Dynamic_Weather_in_CombatFlite|Dynamic Weather in CombatFlite}} |
|
| |
|
| [https://www.combatflite.com/ CombatFlite] | | {{DynWeatherTopics}} |
| | [[Category:Reference|Dynamic Weather]] |
Much like custom labels, DCS' weather system is a heavily obfuscated and largely opaque, but also very capable part of the simulation. The biggest problem with is that, while there is a dynamic weather tab in the mission editor, it exposes roughly none of the capabilities of the system and trying to use it via the editor relies entirely on random chance to create some desired effect using parameters that simply cannot produce them.
A complete lack of control combined with a being completely unfit for purpose is a great way to dissuade the aspiring mission maker from ever using the dynamic weather system, instead relying on the much more immediate and obvious static weather. This guide aims to demystify the capabilities of the dynamic weather available in DCS. With only a little bit of practice, situations like the one depicted at the top of the page — gentle snow falling in light breezes from heavy clouds, with clear skies on the horizon — become a breeze to recreate. This is a weather state that simply cannot be achieved through the use of the mission editor alone.
An introduction to dynamic weather
The main shortfall of the dynamic weather system is, as mentioned, the lack of a UI. To compensate for this, mission designers who want to use dynamic weather will have to stock up on a number of external tools, and also be prepared to engage with a pretty long-winded iterative process of extracting and importing files from the .miz package that the mission editor creates.
Another way the lacklustre UI reveals itself is in the lack of cohesion in what units are used. To manipulate dynamic weather, you will need to do degree-to-radian conversions, nautical mile-to-feet-to-meter conversions, and lat/long-to-meter conversions. It also helps if you are familiar with how many Pascals go into a millimetre (or inch) of mercury.
While there are external mission editing suites such as CombatFlite that can circumvent some of these steps, you will still be bouncing back and forth between external tools and DCS itself to fine-tine and preview the results as they appear in-game. If you don't want that full package (and for some details, even if you do), you will need: a good zip manipulation tool, a unit conversion tool, a good text editor, and a lot of time and patience. You also need to already be familiar with the ins and outs of almost all mission editor tools.
One immediate consideration that always comes up when discussing the respective merits of static and dynamic weather is one of performance. Some testing has shown that it is not as clear-cut as one might expect, where static weather is “simple” and therefore less resource intensive. Rather, it seems like static weather may actually be easier to visually render client-side, and the jury is still out on the performance drain for the simulation as a whole (which matters more on the server end of things).
Dynamic weather editing
There is an immediately obvious way into working with the dynamic weather system: the eponymous tab in the weather control pane. However, even in this tab, most of the controls have nothing to do with dynamic weather, as such, and of the few that actually engage with the weather dynamics, only two are of any actual constructive use — the rest are, if anything, destructive in that they can instantly wipe out a lot of work with no benefit in return.
The only two controls you want to use in the in-editor UI are the left-most box on the row labelled “systems quantity”, and the “pressure deviation” box. All other buttons and boxes — the “baric system” dropdown, the rightmost quantity box, and the “generate” button will all overwrite your work with randomised garbage, forcing you to reload the mission and try again.
Wind flags
The more important part of the weather UI is actually the wind overlay that shows up on the map whenever the dynamic weather tab is open. This overlay shows a coarse (roughly one sample point per 125km) map over wind strengths and directions using a set of rounded flags.
These flags are essentially arrows, with the round dot being the tip that points in the direction of the wind, and with the tail-end flag showing the strength using dashes and triangles. A half-dash is a 5kts wind; a full dash is 10kts; a triangle is 50kts. Add up the number of dashes and triangles to read the full wind value.
Manual weather editing
Most of the actual editing of weather happens outside of DCS, by extraction the ‘mission’ Lua file from the .miz package you are working on and using a sensible text editor to manually adjust coordinates and sizes directly in that file.
These values can be copied from trigger zones that you place as a sort of preview of the pressure systems you want to create, after which the mission file can be re-imported into the .miz file and the results can be previewed in the mission editor and in-game. Even in the simplest case, it is a fairly involved process and the full-length section on weather editing goes into more detail of the various steps involved.
The circuitous process of editing weather, requiring a number of different “scaffolding” mission objects such as dummy trigger zones and the use of static objects to observe the effect, means that it the whole process is best done in a separate dummy mission. The good news is that once all that work is done, it is trivial to export the resulting weather setup and import it into any number of existing or future missions.
The technical details: pressure front parameters
Advanced dynamic weather editing
Weather editing simplified: CombatFlite