LANTIRN: Difference between revisions
Jump to navigation
Jump to search
No edit summary |
(Formatting changes) |
||
| Line 1: | Line 1: | ||
<big>'''LANTIRN checklist and tips'''</big> WIP | <big>'''LANTIRN checklist and tips'''</big> WIP | ||
<u>'''!!! LASER CODE ON THE BOMBS IS SET FROM THE KNEEBOARD ON THE GROUND !!!'''</u> | <u>'''!!! LASER CODE ON THE BOMBS IS SET FROM THE KNEEBOARD ON THE GROUND !!!'''</u> | ||
| Line 10: | Line 8: | ||
==RIO== | |||
*LASER switch to ARM, LASER ARMED illuminates | ===LANTIRN warmup=== | ||
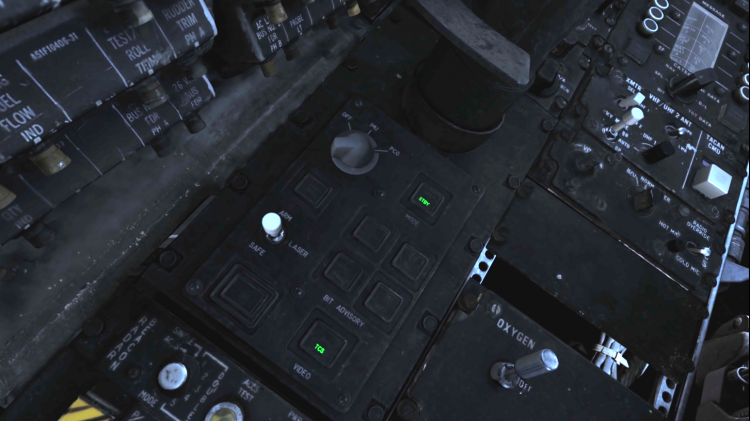
Start this early cause it takes forever [[File:Lantirn Panel.png|thumb| upright=2.5|LANTIRN Control Panel]] | |||
# ROTARY below the LANTIRN stick into PCO position (8 min warm-up) | |||
* | # STANDBY light illuminates below the LANTIRN stick post warm-up, press it to unstow the camera | ||
#* STANDBY starts flashing, after 30 seconds OPER illuminates instead of STANDBY | |||
# LASER switch to ARM, LASER ARMED illuminates | |||
# VIDEO button from TCS to FLIR | |||
# TID MODE above the HCU to TV | |||
#* After the TPOD is warmed up, and the camera is unstowed | |||
<br style="clear:both"> | |||
===RIO Armament Panel=== | |||
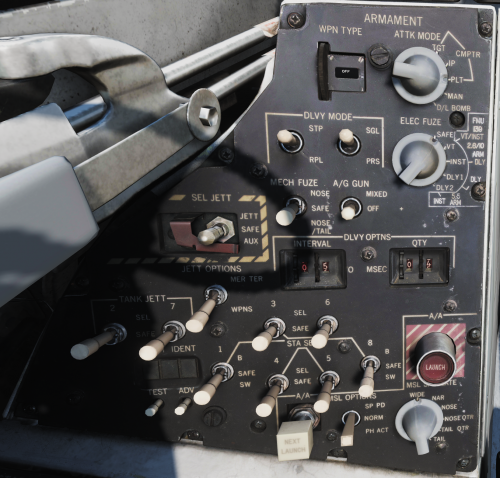
[[File:Armamentpanel1.png|500x500px|thumb|upright=2.5|Armament Panel]] | |||
You can set this up while the TPOD is warming up | |||
# WPN TYPE WHEEL: Select the current weapon type, for example GBU12 | |||
#* The selection text is mirrored on the TID and LANTIRN feed, if you're in VR and the wheel is hard to read, it can be enabled in the F-14 '''SPECIAL SETTINGS''' | |||
# DLVY MODE: STP+SGL | |||
# ATTK MODE: MAN | |||
# ELEC FUZE: INST | |||
# MECH FUZE: NOSE | |||
# Select stations loaded with corresponding munitions on the store selection panel switches | |||
#* You can see which stations are loaded with what munitions on one of the kneeboard pages | |||
<br style="clear:both"> | |||
===LANTIRN laser code setup=== | |||
# LANTIRN A-G mode, press the LANTIRN Mode toggle, to cycle A-A and A-G modes | |||
# SLIDER to Laser, turns on laser edit mode for the <u>''S4''</u> HAT | |||
# <u>''S4''</u> HAT to change the laser code | |||
#* Up and down to cycle number, right and left to switch to next and previous number | |||
<br> | |||
* | |||
# <u>''S4''</u> HAT PRESS to change '''A'''UTO and '''M'''ANUAL laser modes, indicated on the left side of the laser code | |||
#* AUTO mode lases from TIMP (time to impact) 10 to +4 (indicated by flashing '''L''' below the TPOD cross while the laser is active) | |||
# SLIDER to Laser again, to deselect laser editing mode | |||
===LANTIRN target acquisition=== | |||
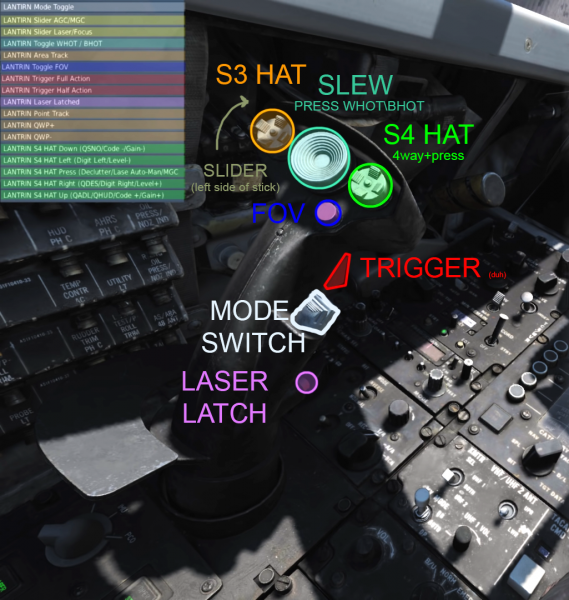
[[File:Binds.png|600x600px|thumb|LANTIRN Controls]] | |||
*'''S3''' HAT RIGHT ('''QWP+''') or LEFT ('''QWP-''') to cue the pod onto the next\previous waypoint in the flight plan. | |||
** In A-G it cues onto the ground at waypoint, in A-A it cues to the airspace above the waypoint. | |||
*'''S3''' HAT RIGHT ('''QWP+''') or LEFT ('''QWP-''') to | ** You can set up the waypoints before or during flight using the FAC\FAC-A\JTAC or the F10 map coordinates. | ||
** | *<u>''S4''</u> UP ('''QHUD\QADL''') cues the LANTIRN to the aircraft wings symbol on the HUD in A-G, to ADL in A-A mode | ||
** | ** If lacking waypoints or you need to point the pod at something quickly, with help of the pilot. | ||
*<u>''S4''</u> | *<u>''S4''</u> DOWN ('''QSNO''') cues the sensor to the ground 15 NM directly in front of the aircraft along own aircraft heading. | ||
** | ** When you only know bearing to ground targets, or for scanning the area on your flight path. | ||
* | *'''S3''' HAT DOWN ('''Area Track''') to ground stabilize the pod after cueing or target a building or other stationary target. | ||
** | ** Aim at the base of the unit in this mode, e.g. bottom of the tracks on a tank, or the laser point will be behind the unit and the bomb will go long. | ||
*'''S3''' HAT UP ('''Point Track''') to contrast lock a specific target, or a moving target. A box will appear around the locked unit. | |||
*'''S3''' HAT UP ('''Point Track''') to contrast lock a specific target, or a moving target. A box will appear around the locked unit | |||
*SLEW HAT to slew the pod around, can also be bound to an axis | *SLEW HAT to slew the pod around, can also be bound to an axis | ||
*FOV button for cycling 3 zoom levels | *FOV button for cycling 3 zoom levels | ||
*LANTIRN HALF ACTION (trigger first stage) to '''manually lase''' and get '''slant range''' to view point | *LANTIRN HALF ACTION (trigger first stage) to '''manually lase''' and get '''slant range''' to view point | ||
**laser in | ** The laser in DCS is a physical object (''stick'') with a length of 10NM (''nice stick bro''), be sure you're within 10nm '''slant range''' ('''SRA''' on the bottom left of the LANTIRN feed) when the bomb starts guiding on the laser. | ||
*LANTIRN FULL ACTION (trigger second stage) to '''designate''' a target, display | *LANTIRN FULL ACTION (trigger second stage) to '''designate''' a target, display LANTIRN drop cues and designated point coordinate information | ||
** | ** Don't be shy to designate to keep awareness of the area, but keep in mind that designating again <u>overwrites</u> the previous point, and <u>resets the drop cue parameters</u>, so don't do it if you have a bomb on the way, as it will break autolase and you'll have to <u>lase manually</u> to save the drop. | ||
*<u>''S4''</u> HAT RIGHT ('''QDES''') to | *<u>''S4''</u> HAT RIGHT ('''QDES''') to cue the pod to the designated point. | ||
** | ** Useful for snapping back to the combat area or target if you lose tracking due to pod masking or gimbal limits. | ||
*LASER LATCH button will keep the laser on until you press the HALF ACTION to cancel it | *LASER LATCH button will keep the laser on until you press the HALF ACTION to cancel it | ||
** | ** Useful for buddy lasing and not having to hold the trigger for 5 minutes | ||
<br style="clear:both"> | |||
==Pilot== | |||
[[File:Lantirn.png|800x800px|frameless|right]] | |||
===Prep=== | |||
#A-G master mode | |||
#Master Arm on | |||
#Weapon Selector to off | |||
#*(bottom position, will have "ORD" on the HUD) | |||
#VDI set to TV mode | |||
#* This lets you see the LANTIRN video feed | |||
#Wing sweep bomb mode | |||
#* This is probably optional :shrug: | |||
===Drop=== | |||
After your RIO confirms that target is designated and cues are valid: | |||
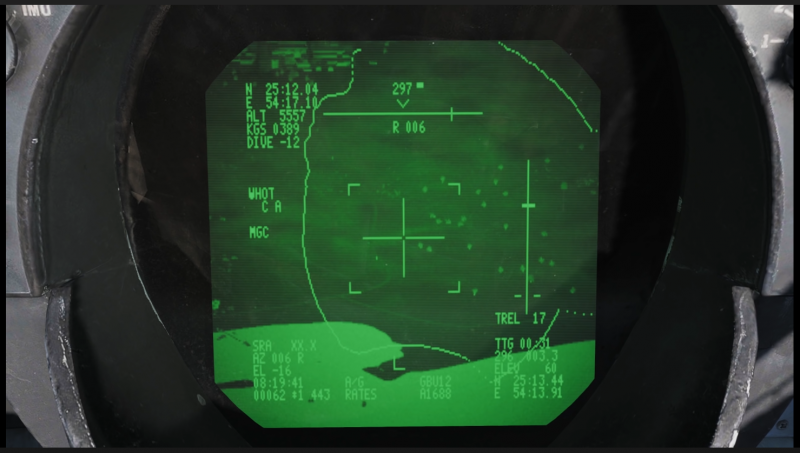
# Fly the LANTIRN drop cues on the VDI and drop the bomb manually by pressing the pickle button. | |||
#* Bearing to target is displayed on top of the VDI LANTIRN feed by a horizontal line, with own bearing on top, and target deviation below (L 060 means you need to turn 60 degrees left) | |||
#* Bomb fall line on the right, with two dashes at the bottom, a falling dash on the line and TREL (time to release) countdown, drop when the fall line dash reaches two dashes | |||
* | |||
* | |||
| Line 105: | Line 104: | ||
<br> | <br> | ||
<br> | <br> | ||
==Hats cheat sheet== | |||
{| class="wikitable" | {| class="wikitable" | ||
|- | |- | ||
Revision as of 16:26, 8 May 2020
LANTIRN checklist and tips WIP
!!! LASER CODE ON THE BOMBS IS SET FROM THE KNEEBOARD ON THE GROUND !!!
Full F-14 LANTIRN video guide by RedKite (YouTube) - took some pictures from the video cause lazy and sleepy
RIO
LANTIRN warmup
Start this early cause it takes forever
- ROTARY below the LANTIRN stick into PCO position (8 min warm-up)
- STANDBY light illuminates below the LANTIRN stick post warm-up, press it to unstow the camera
- STANDBY starts flashing, after 30 seconds OPER illuminates instead of STANDBY
- LASER switch to ARM, LASER ARMED illuminates
- VIDEO button from TCS to FLIR
- TID MODE above the HCU to TV
- After the TPOD is warmed up, and the camera is unstowed
RIO Armament Panel
You can set this up while the TPOD is warming up
- WPN TYPE WHEEL: Select the current weapon type, for example GBU12
- The selection text is mirrored on the TID and LANTIRN feed, if you're in VR and the wheel is hard to read, it can be enabled in the F-14 SPECIAL SETTINGS
- DLVY MODE: STP+SGL
- ATTK MODE: MAN
- ELEC FUZE: INST
- MECH FUZE: NOSE
- Select stations loaded with corresponding munitions on the store selection panel switches
- You can see which stations are loaded with what munitions on one of the kneeboard pages
LANTIRN laser code setup
- LANTIRN A-G mode, press the LANTIRN Mode toggle, to cycle A-A and A-G modes
- SLIDER to Laser, turns on laser edit mode for the S4 HAT
- S4 HAT to change the laser code
- Up and down to cycle number, right and left to switch to next and previous number
- S4 HAT PRESS to change AUTO and MANUAL laser modes, indicated on the left side of the laser code
- AUTO mode lases from TIMP (time to impact) 10 to +4 (indicated by flashing L below the TPOD cross while the laser is active)
- SLIDER to Laser again, to deselect laser editing mode
LANTIRN target acquisition
- S3 HAT RIGHT (QWP+) or LEFT (QWP-) to cue the pod onto the next\previous waypoint in the flight plan.
- In A-G it cues onto the ground at waypoint, in A-A it cues to the airspace above the waypoint.
- You can set up the waypoints before or during flight using the FAC\FAC-A\JTAC or the F10 map coordinates.
- S4 UP (QHUD\QADL) cues the LANTIRN to the aircraft wings symbol on the HUD in A-G, to ADL in A-A mode
- If lacking waypoints or you need to point the pod at something quickly, with help of the pilot.
- S4 DOWN (QSNO) cues the sensor to the ground 15 NM directly in front of the aircraft along own aircraft heading.
- When you only know bearing to ground targets, or for scanning the area on your flight path.
- S3 HAT DOWN (Area Track) to ground stabilize the pod after cueing or target a building or other stationary target.
- Aim at the base of the unit in this mode, e.g. bottom of the tracks on a tank, or the laser point will be behind the unit and the bomb will go long.
- S3 HAT UP (Point Track) to contrast lock a specific target, or a moving target. A box will appear around the locked unit.
- SLEW HAT to slew the pod around, can also be bound to an axis
- FOV button for cycling 3 zoom levels
- LANTIRN HALF ACTION (trigger first stage) to manually lase and get slant range to view point
- The laser in DCS is a physical object (stick) with a length of 10NM (nice stick bro), be sure you're within 10nm slant range (SRA on the bottom left of the LANTIRN feed) when the bomb starts guiding on the laser.
- LANTIRN FULL ACTION (trigger second stage) to designate a target, display LANTIRN drop cues and designated point coordinate information
- Don't be shy to designate to keep awareness of the area, but keep in mind that designating again overwrites the previous point, and resets the drop cue parameters, so don't do it if you have a bomb on the way, as it will break autolase and you'll have to lase manually to save the drop.
- S4 HAT RIGHT (QDES) to cue the pod to the designated point.
- Useful for snapping back to the combat area or target if you lose tracking due to pod masking or gimbal limits.
- LASER LATCH button will keep the laser on until you press the HALF ACTION to cancel it
- Useful for buddy lasing and not having to hold the trigger for 5 minutes
Pilot
Prep
- A-G master mode
- Master Arm on
- Weapon Selector to off
- (bottom position, will have "ORD" on the HUD)
- VDI set to TV mode
- This lets you see the LANTIRN video feed
- Wing sweep bomb mode
- This is probably optional :shrug:
Drop
After your RIO confirms that target is designated and cues are valid:
- Fly the LANTIRN drop cues on the VDI and drop the bomb manually by pressing the pickle button.
- Bearing to target is displayed on top of the VDI LANTIRN feed by a horizontal line, with own bearing on top, and target deviation below (L 060 means you need to turn 60 degrees left)
- Bomb fall line on the right, with two dashes at the bottom, a falling dash on the line and TREL (time to release) countdown, drop when the fall line dash reaches two dashes
Full F-14 LANTIRN video guide by RedKite (YouTube)
Hats cheat sheet
| POINT track | ||
| QWP- | S3 HAT | QWP+ |
| Area track |
| QHUD\QADL | ||
| ------- | S4 HAT | QDES |
| QSNO |


