Lessons
AIR GOONS NAVIGATION COURSE - DON'T BE A WAYPOINT CRIPPLE
Goofus flies in the general direction of the target, wasting time and fuel when he gets lost.
Gallant flies straight to where he means to, filled with confidence and vigor.
Lesson 1: Magnetic Variation
Has the following ever happened to you? You're trying to fly to a particular point. You open the F10 Map and use the ruler tool to measure the bearing and distance between your aircraft and that point. You turn to the bearing you measured, but despite carefully tracking that heading, you still find yourself noticeably off course. There wasn't even any wind in the mission. What happened?‚Äč
True vs. Magnetic Heading
The ruler tool in the DCS World Map and Mission Editor gives you True Heading measurements. However, almost all navigation systems display Magnetic Heading (some are toggleable).
The difference between Magnetic Heading and True Heading is due to the difference in location between the Magnetic North Pole (formed by currents of molten iron in the Earth's core, currently located somewhere in Northern Canada) and True North Pole (Santa's House, the point around which the globe spins).
Magnetic Variation
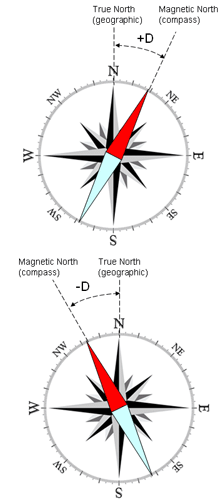
Magnetic Variation, also called Magnetic Declination, is the difference in degrees between the Magnetic North and True North.
- When Magnetic North points East of True North, the sign of the Variation is Positive.
- When Magnetic North points West of True North, the sign of the Variation is Negative.
Note: Do not confuse Variation or Declination with Magnetic Deviation, which caused by local effects of the airplane's metallic structure on the magnetic compass reading (not simulated in DCS).
How to Find Magnetic Variation
Magnetic Variation can be found on navigation charts. Some DCS modules show you the actual in-game variation either in avionics or on the kneeboard...
- F-14: Kneeboard (Ground Settings, MAG VAR)
- F-16: DED: LIST - 0 MISC - 2 MAGV
- F-18: HSI - DATA - A/C
- AV-8B: Kneeboard (Initial Position: 4. Magvar)
- Mirage-2000: PCN DEC
Magnetic Variation in DCS Maps
Magnetic Variation differs per LOCATION and TIME. The following are "close enough" approximations.
Magnetic Variation per Map in 2016 (Approximate)
- Nevada: +12
- Caucuses: +6
- Syria: +5
- Persian Gulf: +2
- Marianas: +1
Converting True to Magnetic Heading
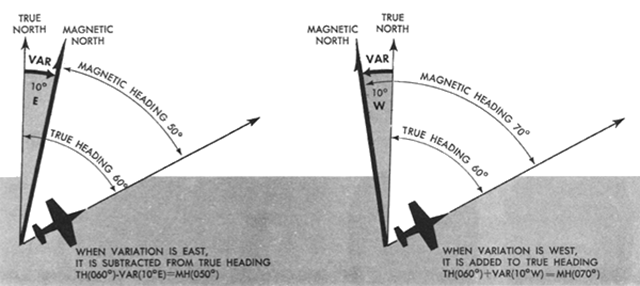
True Heading = Magnetic Heading + Variation
Magnetic Heading = True Heading - Variation
Note: If Variation is West, remember to use a Negative Sign in the above equations.
Another helpful mnemonic for converting True to Magnetic Heading is East is Least, West is Best.
- Subtract the magnitude of a East variation ("East is Least")
- Add the magnitude of a West variation ("West is Best")
Example: Batumi to Kutaisi Flight
It's 2008 and you're on the DCS Caucuses Map. You want to fly from Batumi Airfield to Kutaisi Airfield. The True Bearing measured from the F10 map is 043 degrees. What is the Magnetic Bearing?
- Magnetic Bearing = True Bearing - Variation
- Magnetic Bearing = 043 - 6
- Magnetic Bearing = 037
Bonus: Heading, Bearing, Course, and Track‚Äč
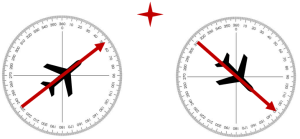
- Heading is the direction the airplane's nose is pointed.
- Bearing is the direction between two points.
- Course is very similar to bearing. It's the desired direction you want to fly. If you're flying directly to a point, your course is the same as its bearing.
- Track is actual path the airplane takes across the ground. It's affected by wind and navigational inaccuracies.
DCS Limitations: Flaming Cliffs
All low fidelity modules of the Flaming Cliffs 3 series, in addition to the default SU-25T, operate only with True Headings. Yes, even the magnetic compass in these planes show True Heading.
If you're flying such a plane, you can ignore everything in this lesson. Your F10 Map Headings will match exactly with what your aircraft compass shows.
The Goon knows where he is at all times. He knows where he is, because he knows where he isn't...
Horizontal Situation Indicator
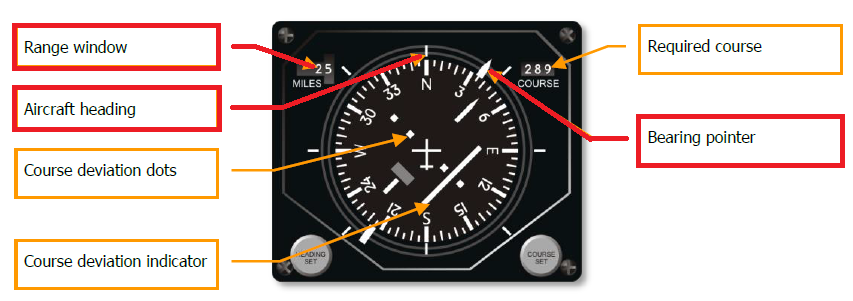
The primary navigation instrument of all modern jet aircraft is the Horizontal Situation Indicator (HSI). Pictured is the HSI found on the DCS F-15C Eagle. The HSI on your particular aircraft might look different, but they all have the same features.
- A rotating compass card that shows your aircraft heading on the top.
- A bearing pointer that points to your selected navigation target. Be that an INS waypoint, VOR, TACAN, or Sensor Point of Interest (SPI).
- A range window that shows your distance (in nautical miles or kilometers) from the selected navigation target.
- An adjustable course needle and course deviation indicator.
For this lesson and subsequent lessons, we will not use the adjustable course needle. The reasons are twofold:
- Low fidelity modules of the FC3 series do not allow the player to adjust the course to a waypoint.
- In full fidelity modules, tactical navigation can be performed safely and efficiently without taking hands off flight controls to adjust knobs.
Flying Directly To/From a Point
The most basic navigation tasks consists of flying directly to your destination.
Goofus accepts the bearing pointer by blind faith.
Gallant double checks his avionics, making double-sure he's in the correct navigation mode and has the right waypoint selected.
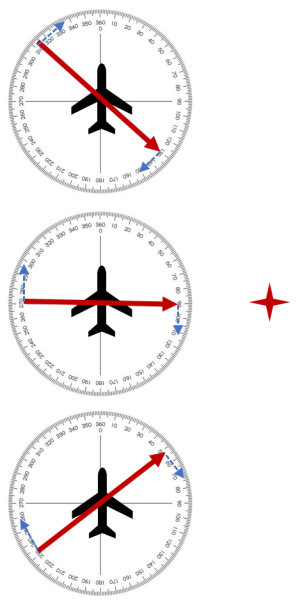
- To fly to a point, turn so the bearing pointer head is at 12 o'clock on your HSI.
- To fly directly away from a point, turn so the bearing pointer tail is at 12 o'clock on your HSI.
Lesson 3: Flying a DME Arc
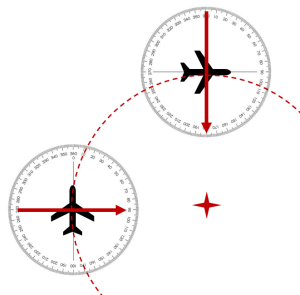
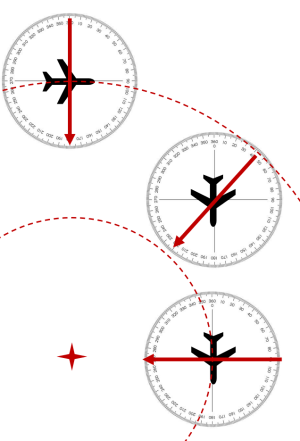
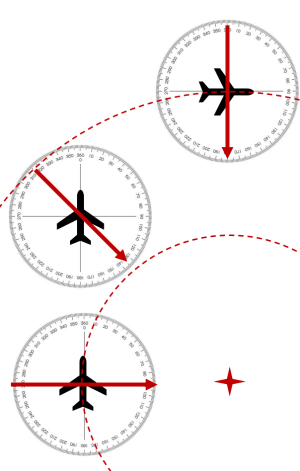
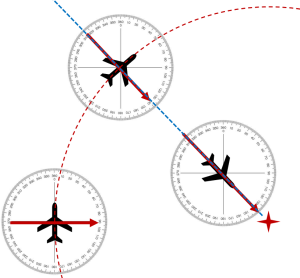
A DME Arc involves flying a constant-radius circle, or portion of a circle, around a designated point. Tactically, this can be used to anchor your flight over a specific geographical landmark, or to orbit a target to observe it while remaining outside enemy weapons range. This maneuver is also commonly used in instrument procedures.
To Enter a DME Arc:
- Turn to place the bearing pointer head at either the 3 or 9 o'clock position on your HSI. The exact choice depends on the tactical situation, it may be preferable to put the bearing pointer head on the same side as your targeting pod.
- Keep turning to maintain the bearing pointer head at 3 or 9 o'clock. Depending on the size of your arc, you may find it easier to keep a continuous bank, or fly short straight segments. To fly short segments: Allow the bearing pointer to drift aft 5-10 degrees behind your 3/9 line. Then turn to place the bearing pointer 5-10 degrees ahead of your 3/9 line and level your wings, allowing the bearing pointer to drift aft again, and repeat.
To Decrease Radius on a DME Arc:
- Steepen your turn, placing the bearing pointer ahead of the 3/9 line on the HSI.
- Watch the distance decrease.
- When you reach the desired distance, turn to place the bearing pointer on the 3/9 line.
To Increase Radius on a DME Arc:
- Level your wings, allow the bearing pointer to drift behind your 3/9 line on the HSI.
- Watch the distance increase.
- When you reach the desired distance, turn to return the bearing pointer to the 3/9 line.
Arcing to a Radial:
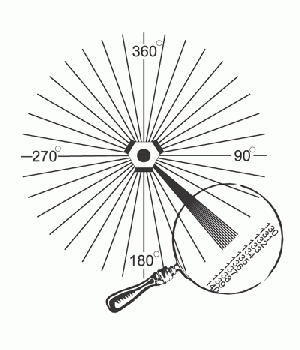
A radial describes your position relative to another point, from its perspective. Imagine 360 bicycle spokes coming out from a point in the ground. The spoke pointed due North is the 360 radial, the spoke due East is the 090 radial, and so forth.
Note: Radials can be confusing but they are always numbered by the bearing from a point. For example, if your bearing to a point is 180, you are on its 360 radial.
Intercepting a radial is commonly using in instrument approach procedures to align you with the landing runway. Tactically, it can be used to control the direction from which you attack a target, either due to geographical constraints (i.e. the target is in a valley running North-South) or due to the presence of nearby friendly forces.
Tip: The bearing pointer tail always points to the radial you are on.
To Intercept a Radial Inbound:
- Arc until the bearing pointer tail reaches the desired radial.
- Turn directly to the waypoint.
Lesson 4: Intercepting a Course
Thus far you've learned to fly directly from point to point, and to fly DME Arcs around points. Hopefully, the mission maker placed waypoints at every place you need to go. But what if you're playing a large dynamic mission. There's targets all over the map, and only a few fixed navigation points to use. You could look up the coordinates and type them into your INS system, but if you're flying a low fidelity module that's not an option.
It's now time to free yourself from the constraints of direct waypoint to waypoint navigation. Being able to choose your own course allows you to accurately navigate to any spot on the map of your choosing!
Intercepting a specific course to or from fix is almost identical to intercepting a radial. Again, we are NOT going to use the Course Selector Knob. The simple Bearing Pointer is all we need.
The Head Always Falls, the Tail Always Rises
Observant pilots would notice that when flying past a fix, the bearing pointer head will always rotate towards the rear of the aircraft. Hence, the saying "The Head Always Falls" because the Bearing Pointer Head will always move downwards, away from the nose of the airplane. Conversely, the opposite is true for the Bearing Pointer Tail "The Tail Always Rises." The Bearing Pointer Tail will always move up, towards the nose of the airplane. To intercept any particular course, we can use this trick to manipulate the bearing pointer until it lines up with our desired course.
Intercepting an Inbound Course: The Head Always Falls
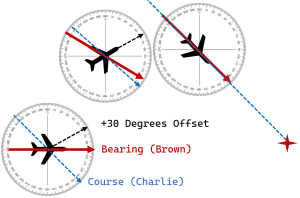
You are on the 270 Radial, directly inbound. You wish to intercept the 130 Course Inbound. Which way do you turn, and how much?
- Turn so the Bearing Pointer Head is on the same side of the plane, and above the desired course. That means a Left Turn.
- How much? Use 30 Degrees from the Bearing Pointer as a good Rule of Thumb.
- Wait for the head of the bearing pointer to drop to the desired course. The Head Always Falls.
- Turn inbound along the course.
CHARLIE BROWN +30
The mnemonic for this is CHARLIE BROWN +30 - From bottom to top, Course Line (Charlie), Bearing Pointer (Brown), 30 Degree Offset (+30)
Intercepting an Outbound Course: The Tail Always Rises
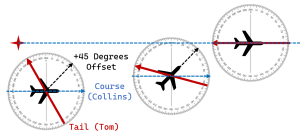
You are on the 150 Radial, flying East. You wish to intercept the 090 Course Outbound. Which way do you turn and how much?
- Turn so the Bearing Pointer Tail is on the same side of the plane and below the desired course line.
- Rule of thumb: Put the Course Line 45 degrees off your nose.
- Wait for the tail of the bearing pointer to rise to the desired course. The Tail Always Rises.
- Turn outbound along the course.
TOM COLLINS +45
The equivalent mnemonic to CHARLIE BROWN +30, is TOM COLLINS +45. From Bottom to Top: Tail of Bearing Pointer (Tom), Course Line (Collins), +45 degree Offset.
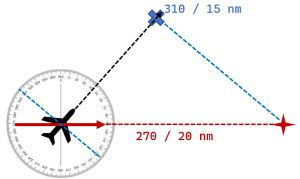
In this lesson you will learn to fly directly from one position to another. All you need to know is the relative location of both you and your destination relative to any fix. It may seem like magic, or rocket science, but it only requires some visualization skills. No Math Required!
Tactically, this same technique can be used in the air-to-air fight to respond to Bullseye calls.
Point to Point Scenario
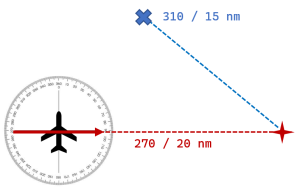
You are currently 20 miles West of the Fix on the 270 Radial. Your destination is on the 310 Radial at 15 nautical miles. What heading do you need to fly to reach it?
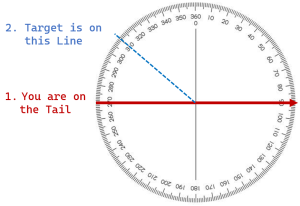
Step 1: Visualize the Bearing Lines
- Look at the HSI and imagine the center of the HSI is the Fix.
- Your plane is on the line formed by the Bearing Pointer Tail (270).
- Your destination is on the line going from the Center of the HSI out to the destination's bearing (310).
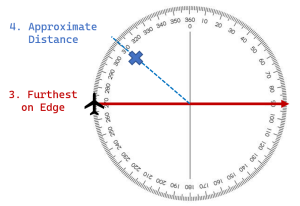
Step 2: Plot Relative Positions
- Take whichever is furthest from the Fix, your plane or your destination, and place that on the edge of the HSI Compass Card along its appropriate Bearing. In this example, you are 20 nm away, while the destination is 15 nm away, so your plane goes on the edge of the compass card.
- Place the other one along its Bearing Line at the appropriate spot based on the ratio of distances. In this case, 15/20 = 3/4, so the destination goes 3/4 of the way out to the edge of the HSI Compass Card, along the 310 bearing line.
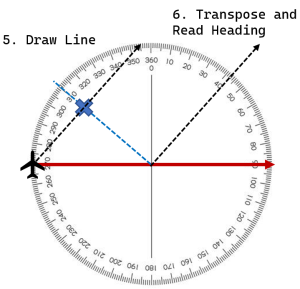
Step 3: Draw Line and Transpose
- Draw a Line connecting the Plane and the Destination.
- Transpose that Line to the middle of the HSI in order to read the heading off the HSI Compass Card.
Step 4: Turn to Heading
- Turn to the heading you just calculated, and monitor the HSI Bearing Pointer and Range Window. You should see the Bearing Pointer Tail rising to meet the Bearing of your destination, and the number in the Range Window moving towards its Distance.
- You may need to repeat the procedure in order to make adjustments to your course as you fly towards your destination.
- In case you reach the correct radial before the correct distance, fly outbound directly along the radial to find your destination.
- In case you reach the correct distance before the tail reaches the radial, turn and fly a DME Arc until you reach your destination.


